

Vibecoding with ChatGPT 5.6: Building a DIY USB Webcam Security System Linked to Telegram
A case study of DIYing a local security camera system using an old USB webcam and ChatGPT 5.6 Sol to ease parking anxiety. Through only three rounds of conversation with the AI, the author successfully built a desktop application featuring GUI-based monitoring zone selection, autofocus/lighting noise filtering, instant Telegram notifications with motion-triggered recording, and an automated 3x3 grid video preview.

🚗 Say Goodbye to Car Anxiety! How I "Vibecoded" a Roadside Parking Security Camera System in Minutes using ChatGPT 5.6!
I live in an apartment with an open, ground-level parking lot right next to a busy street. While it's super convenient for driving out, watching people and traffic pass by constantly always left me with a bit of "car anxiety."
I had an old USB webcam lying around, and since ChatGPT 5.6 just dropped, I couldn't resist doing some good old Vibecoding (coding purely by vibe and flow) to see if I could build a quick fix for this pain point.
For this project, I used ChatGPT 5.6 Sol. The development experience was incredibly smooth. I only needed 3 quick prompts (prompts/responses), and it generated a flawlessly functioning app. Honestly, AI these days is getting scary good.
Here is the full record of my prompts and the final user manual for the app. If you have a similar setup and want to protect your ride, feel free to copy my homework!
💡 The 3 "Magic Prompts" That Guided ChatGPT 5.6
The secret to getting great code out of an LLM is to start with the skeleton, address the pain points, and then polish the details. Here is how our conversation went down:
🎯 Round 1: Building the Backbone Plan Mode
Me: I am currently using Windows 11. I want to build an application that calls my WebCamera and monitors a "user-specified area" in the frame. If it detects any motion in that area, it should immediately take a screenshot and send it to me via Telegram, while simultaneously triggering a video recording until the motion stops. It must have a GUI so I can easily draw the monitoring zone with my mouse. Please implement this using the simplest method you know.
🛡️ Round 2: Solving False Alarms The Autofocus Struggle
Me: Great! Now we have a slight issue. My webcam seems to have an autofocus feature. Sometimes a bug flies by or the lighting shifts, causing the camera to suddenly refocus and blur the screen. The app mistakes this blur for motion. Can we programmatically disable autofocus? If that's not possible, please think of a way in the algorithm to filter out these sudden full-screen changes so it doesn't trigger false alarms.
📊 Round 3: Visual Summary The 3x3 Preview Matrix
Me: Excellent. Let's add some final polish. When Telegram sends the "Motion ended, video saved to local machine" notification, I also want to receive a 3x3 grid preview image of the saved video. The logic should be: divide the total video duration by 9, extract the frames at those 9 timestamps, stitch them into a single image matrix, and send it along with the text message.
📦 The Final Product: WebCamera Motion Monitor Win 11
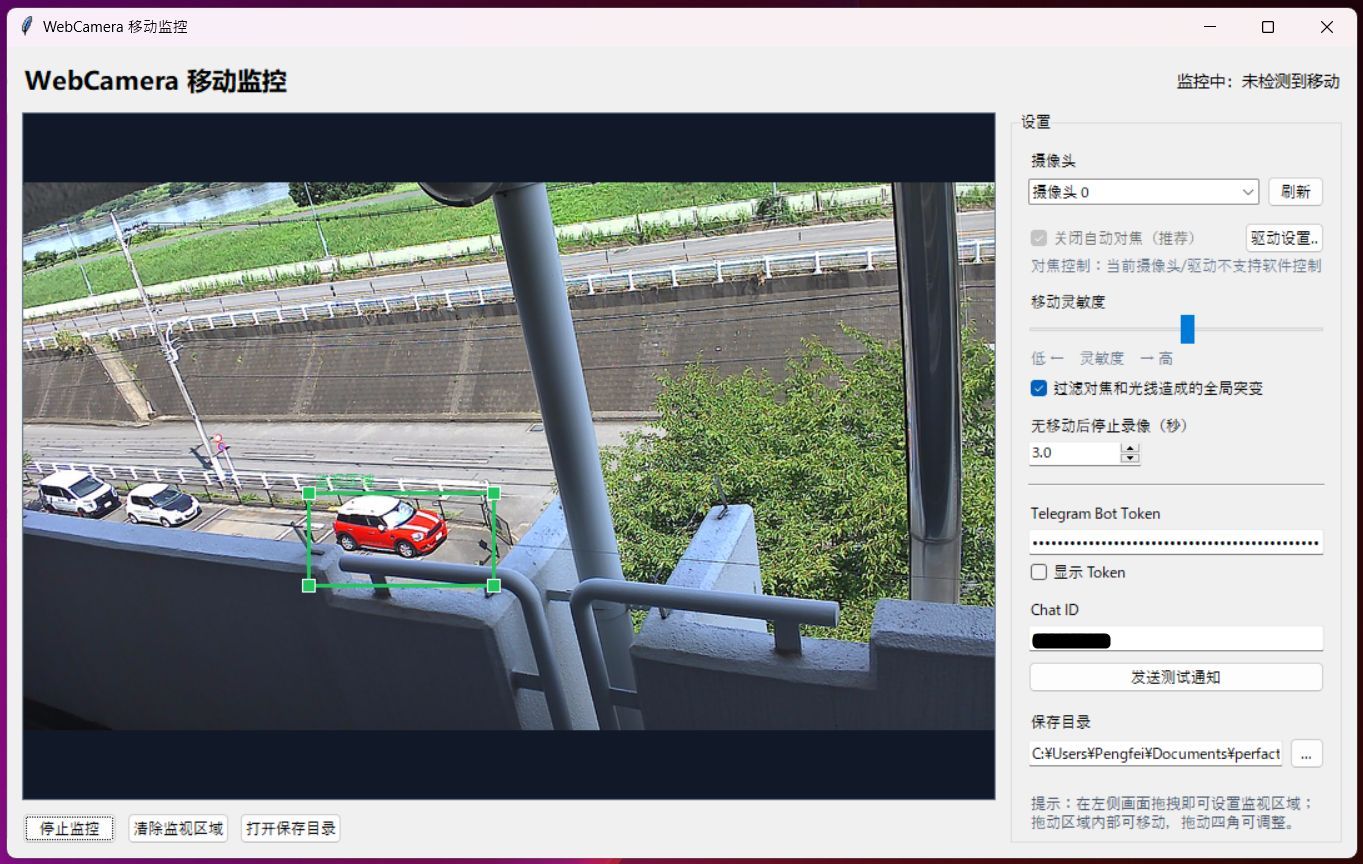
After those 3 quick rounds, this ultra-simple, localized webcam monitoring tool was born!
You just watch the live feed, click and drag your mouse to box out a green monitoring zone, and the app takes care of the rest. When motion is detected in that zone, it fires off this automation sequence:
- Instant Snapshot: Saves a screenshot stamped with the monitored zone and the exact time.
- Real-time Alert: Uses a Telegram Bot to push that snapshot to your phone within seconds.
- Live Recording: Instantly starts recording the full camera feed into an MP4 file.
- Smart Wrap-up: Stopes recording after a set period of no motion, and compiles a 3x3 grid video preview sent straight to your phone with the completion text.
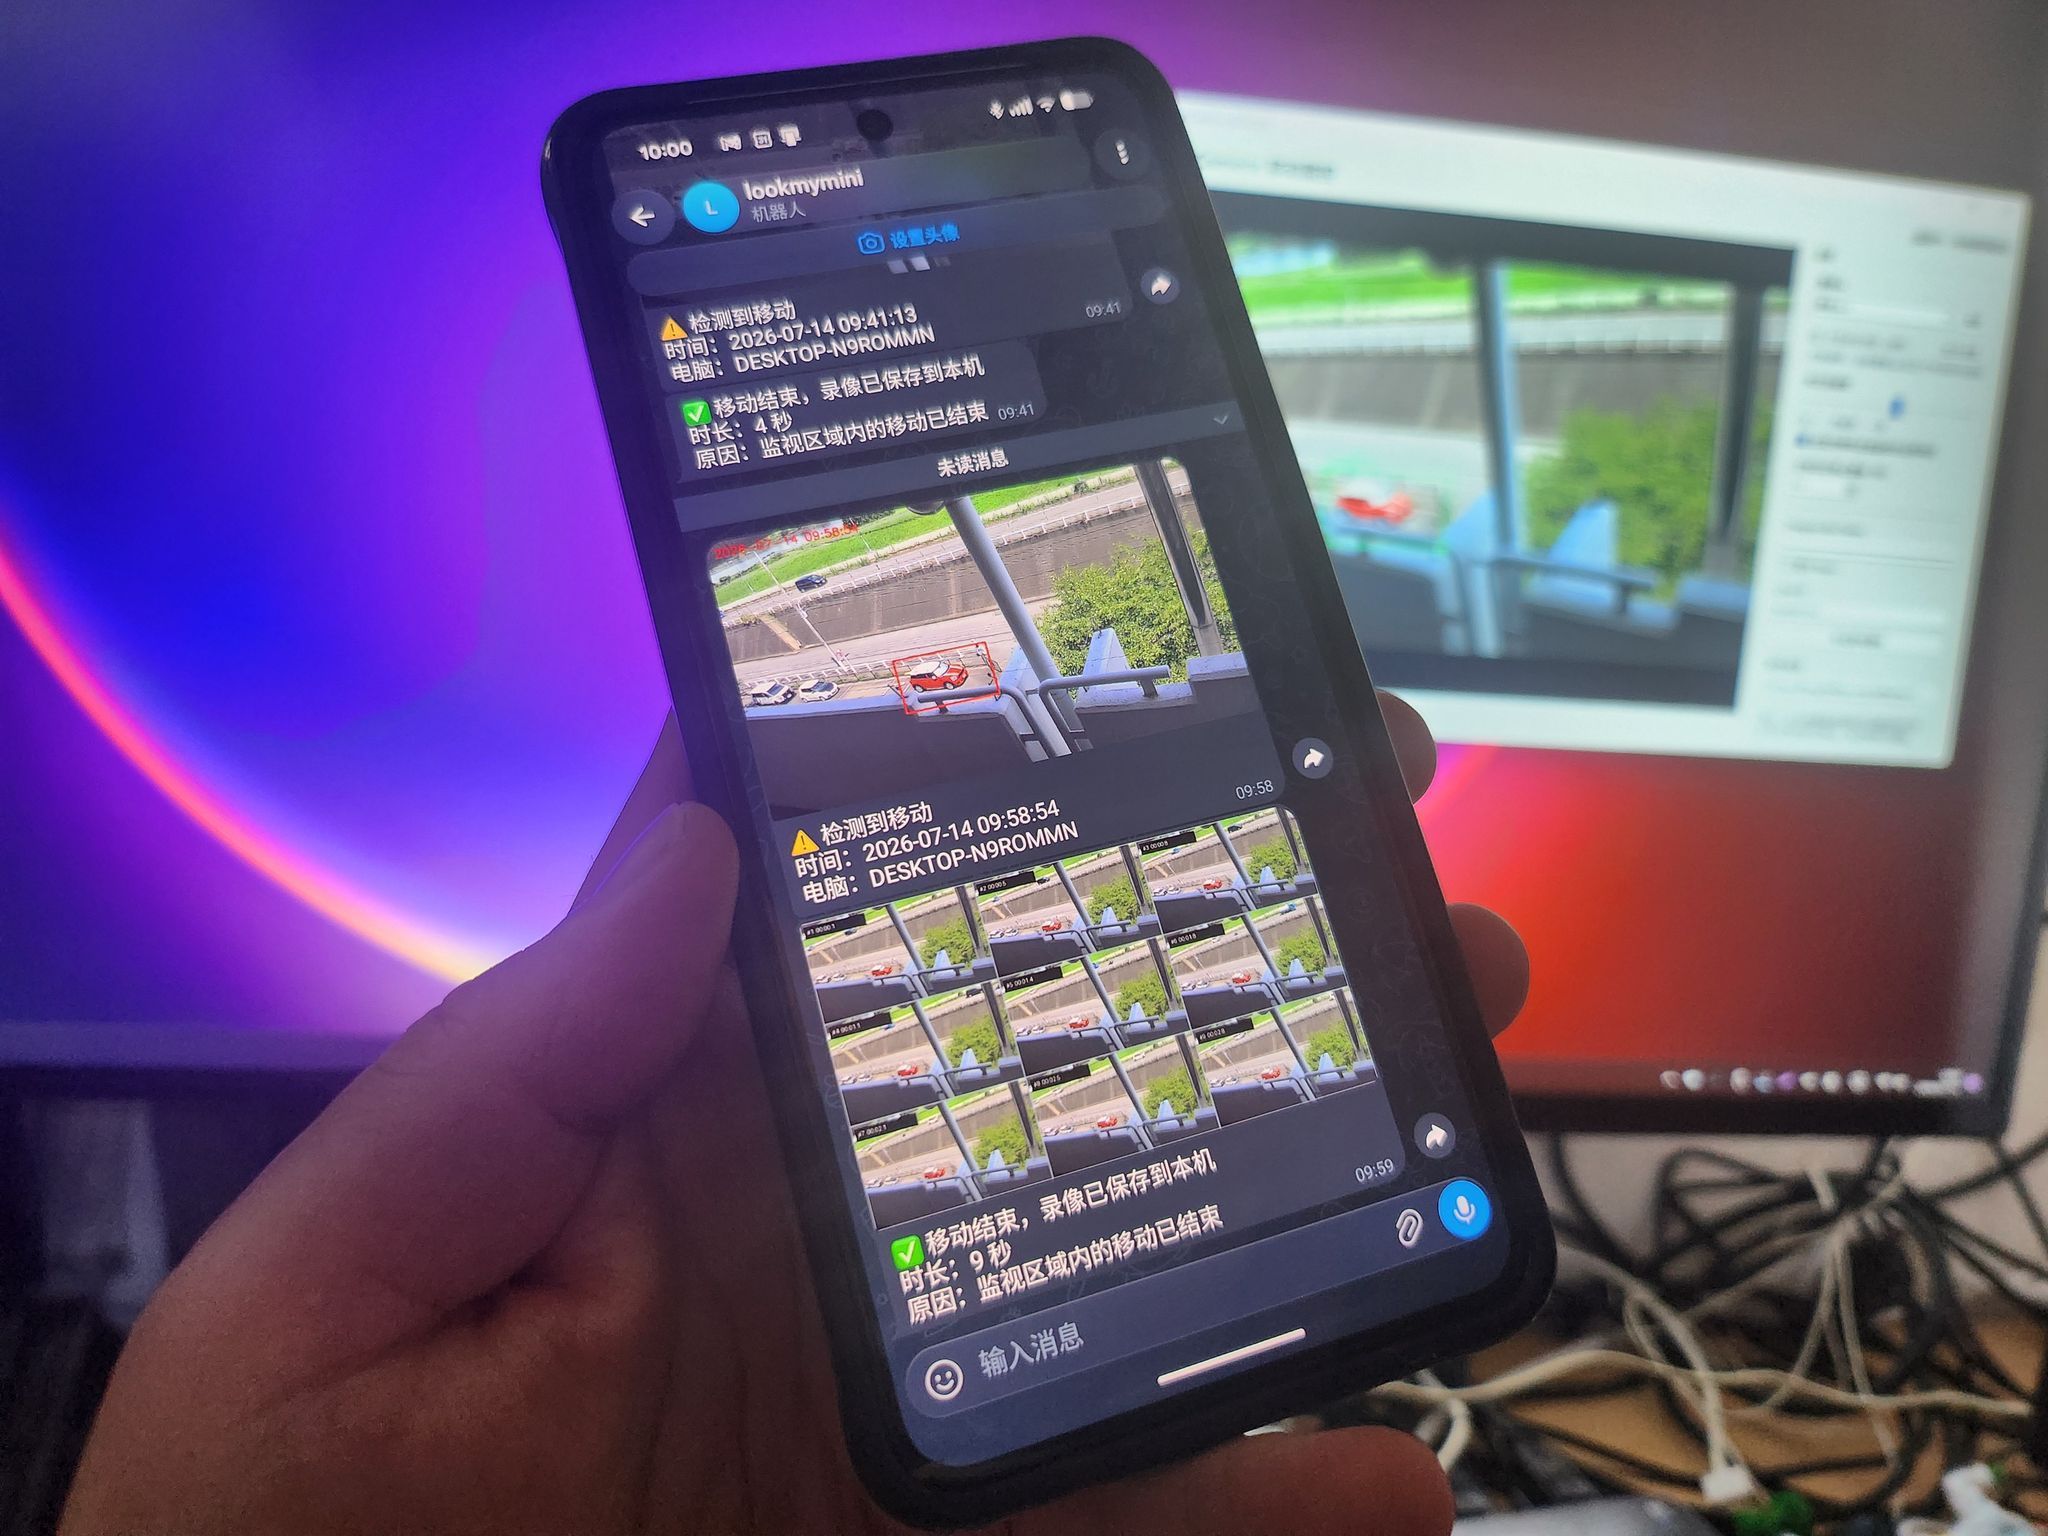
🔒 Privacy First: All video recordings are saved strictly on your local computer. They are never uploaded to Telegram's servers, saving your bandwidth and keeping your privacy 100% secure.
🛠️ 1. Installation & Quick Start
- Go to the Official Python Website and download/install the 64-bit version of Python 3.12 or 3.13.
- 【CRITICAL】 Make sure to check the box that says "Add python.exe to PATH" during installation!
- Open the project folder and double-click
start.bat.
Note on Initial Setup: On the very first run, the script will automatically create a local virtual environment (.venv) and download the required packages (requires an internet connection and takes a few minutes). For subsequent runs, just double-clickstart.bat. Once the GUI pops up, the black command window in the background will automatically close itself.
🤖 2. Setting Up Your Telegram Bot
Linking the monitor to your phone is surprisingly straightforward:
- Search for the official
@BotFatheraccount on Telegram and open a chat. - Send the
/newbotcommand and follow the prompts to name your bot. At the end, it will give you a long string called a Bot Token. - Open the chat with your newly created bot, press the Start button, and send it at least one text message (e.g.,
hello). - Open your web browser and navigate to the following URL (replace
<TOKEN>with your actual Bot Token):
https://api.telegram.org/bot<TOKEN>/getUpdates
- Look through the returned JSON text in your browser, find the
idnumber nested underchat. This is your Chat ID. *(Note: If you are using this in a group chat, add the bot to the group and send a message there first; group IDs usually start with a minus sign).* - Copy and paste both the Token and Chat ID into the app's GUI, then click "Send Test Notification" to verify it works.
⚠️ Security Warning: Your Token is stored in plain text insideconfig.jsonin the project directory. NEVER share this file with anyone or commit it to a public GitHub repository. If it leaks, go back to BotFather and use/revoketo generate a new one.
🎮 3. How to Use the GUI & Key Features
- Device Switching: Wait a moment for the camera feed to load after startup. If you need to switch cameras, select the correct index from the dropdown menu on the right and click "Refresh".
- Double Insurance Against False Alarms:
- Disable Autofocus: Checked by default. The status bar will show whether your hardware driver accepts this software override. Some webcams block external focus controls; if yours does, click "Driver Settings..." to open the native Windows camera property page and manually lock the focus to manual.
- Filter Global Light/Focus Spikes: Checked by default. When the entire screen changes instantly (e.g., turning lights on/off, sudden heavy rain, or lens focus hunting), the program smartly identifies it as an "environmental shift" and rapidly rebuilds the background model without triggering a false alarm or recording.
- Customizing the Monitoring Zone: Click and hold the left mouse button to drag a green rectangular box over the feed. You can drag the center of the box to move it, or drag the four corners to resize it. Clicking "Clear Monitoring Area" defaults the app to monitoring the full screen.
- Sensitivity & Delay:
- Higher "Motion Sensitivity" values mean even tiny movements will trigger an alert. It’s best to avoid aiming the box at moving curtains, flickering screens, or heavy reflections.
- "Stop Recording Delay" defaults to 3 seconds. This ensures that if a subject pauses briefly in front of the camera, the video won't abruptly cut off.
- File Directory: Clicking "Start Monitoring" gives the app 2 seconds to calibrate the initial background environment, after which the system goes live. Screenshots and videos are neatly sorted into folders by date:
captures\YYYY-MM-DD\motion_YYYYMMDD_HHMMSS.jpg      (Instant trigger screenshot)
captures\YYYY-MM-DD\motion_YYYYMMDD_HHMMSS.mp4      (Full event video)
captures\YYYY-MM-DD\motion_YYYYMMDD_HHMMSS_overview.jpg (3x3 grid preview matrix)
The 3x3 Grid Polish: The app divides the video into 9 equal segments, grabs the middle frame from each segment, and automatically timestamps each tile with the video runtime. This matrix image hits your phone alongside the "Recording Finished" text, meaning you can see exactly what happened at a single glance without downloading the full video!
🔍 4. Troubleshooting & FAQ
❓ Camera not found?
Check your Windows 11 privacy settings. Go to Settings → Privacy & security → Camera, and make sure "Camera access" and "Let desktop apps access your camera" are both toggled ON. Also, ensure no other background apps (like Zoom, Teams, or a browser meeting tab) are currently monopolizing the camera.
❓ Local recording works, but no Telegram notifications?
The app is designed to tolerate network dropouts so that a bad internet connection won't crash the actual local security recording. Check your proxy/VPN settings, ensure your Token and Chat ID are correct, and verify you have initiated a chat history with the bot.
❓ Saved MP4 videos won't play?
To make sure the video index closes properly, always stop the monitoring by clicking "Stop Monitoring" in the GUI or by closing the app normally. If the default Windows 11 player struggles to decode the mp4v codec used by the script, we highly recommend switching to a universal player like VLC Media Player.
❓ How do I completely uninstall it?
It is completely portable green software! Just close the app and shift-delete the entire project folder. All dependencies, configurations, and default video recordings are fully contained within this directory (unless you manually changed the save path to another drive).
💬 Closing Thoughts
Back in the day, if you wanted to build a security tool with custom zone selection, you had to manually dig into OpenCV's Background Subtraction algorithms, wrestle with thread management, and spend hours stitching together a UI using Tkinter or PyQt.
Fast forward to today: with ChatGPT 5.6 and a quick bout of Vibecoding, you just explain your needs in plain English, and a perfectly tailored, production-ready utility drops into your lap in minutes. What a time to be alive!
*P.S. On a side note, time flies! It's sad to see the old standalone "Codex" fully retired and merged into the ChatGPT Codex mode T_T. But honestly, the Sol mode in 5.6 is so smooth I can't even complain!*