
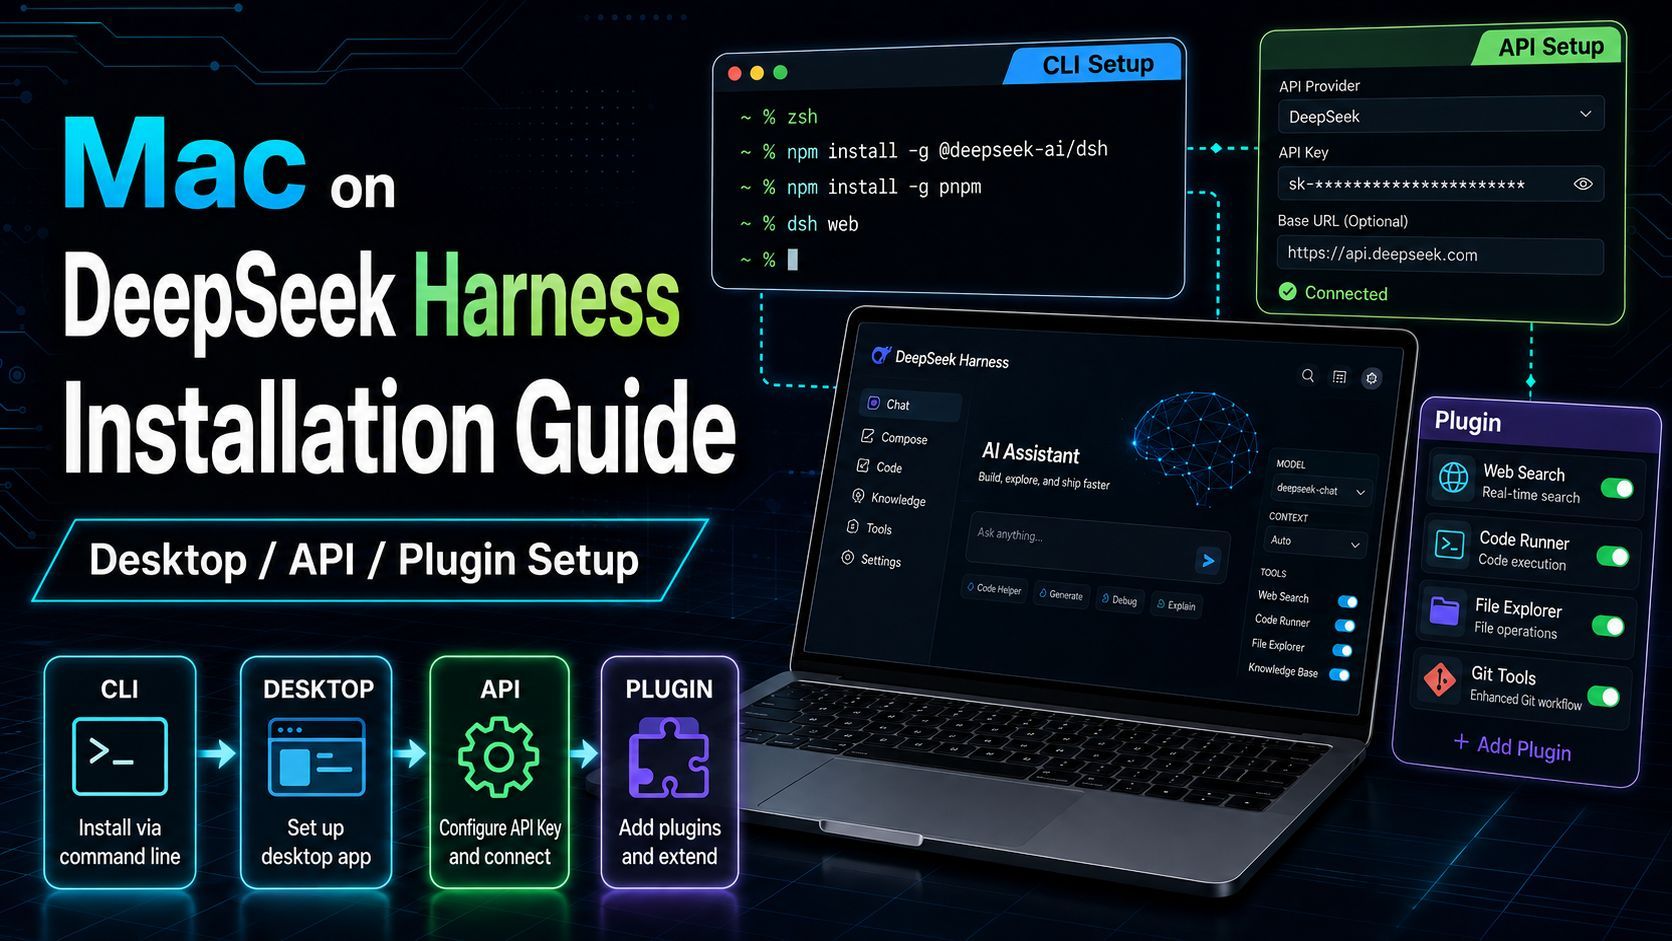
How to Install DeepSeek Harness on Mac: Desktop, API, and Plugin Setup
This guide walks through the practical setup of DeepSeek Harness on Mac, covering Node.js, the dsh CLI, pnpm, the Desktop app, DeepSeek API Key configuration, Plugin installation, and how to switch between Web and Desktop Profiles for different workflows.

How to Install DeepSeek Harness on Mac: CLI, Desktop App, API Setup, and Plugins
DeepSeek Harness has become quite popular recently, so today I want to share how I installed it on my Mac, turned it into a desktop-style application, configured the DeepSeek API, and finally added Plugins.
Before getting started, there is one thing I want to clarify:
My setup process is slightly different from the approach described in the official documentation.
The official method works perfectly well, of course.
However, personally, I do not really want to open Terminal every time, start a local server, and then operate everything from a browser.
Since this is a tool I may use frequently, I prefer something that feels more like a normal desktop application.
So in this article, I will walk through the exact installation approach I used in practice.
Hopefully, it can serve as a useful reference for others.
1. Prerequisite: Install Node.js
Node.js Ver 24
First of all, this guide assumes that Node.js is already installed on your Mac.
As for the question:
How do I install Node.js on macOS?
I will not go into detail here.
Installing Node.js is very straightforward nowadays.
You can simply search online, or ask an AI tool such as ChatGPT, Claude, or Gemini. You should be able to find the installation steps very easily.
Once Node.js is ready, we can start installing DeepSeek Harness.
2. Install the DeepSeek Harness CLI
Open Terminal on your Mac.
The first command we need to run is:
npm install -g @deepseek-ai/dshThis step is actually very important.
It installs the Node.js-based DeepSeek Harness command-line tool globally on your machine.
After that, you will be able to use the following command:
dshthroughout your system.
Why am I emphasizing the CLI installation so much?
The reason will become clear later when we start installing Plugins.
3. Install pnpm
Next, install another tool:
npm install -g pnpmThis installs pnpm.
DeepSeek Harness uses pnpm in its development environment.
I am currently using it from Japan, and in my own setup process, I found that using npm alone did not work smoothly in some places.
So I simply installed pnpm as well.
You can think of this step as:
Preparing the pnpm environment that DeepSeek Harness expects.
Once pnpm is installed, the rest of the setup tends to go much more smoothly.
4. At This Point, DeepSeek Harness Can Already Run
After completing the steps above, DeepSeek Harness can technically already be launched.
Run:
dsh webThis starts the Web version of DeepSeek Harness.
The flow looks roughly like this:
Terminal
    ↓
dsh web
    ↓
Start local server
    ↓
Use DeepSeek Harness in the browser
From a functional perspective, this is already enough.
However, personally, I do not think it is very elegant.
If I am going to use an AI tool regularly on my Mac, opening Terminal, starting a server, and then opening a browser every time feels unnecessarily cumbersome.
So instead of stopping here, I prefer turning it into a desktop application.
5. Install DeepSeek Harness Desktop
Open your browser and go to the following GitHub repository:
https://github.com/anywhere-labs/deepseek-harness-desktop
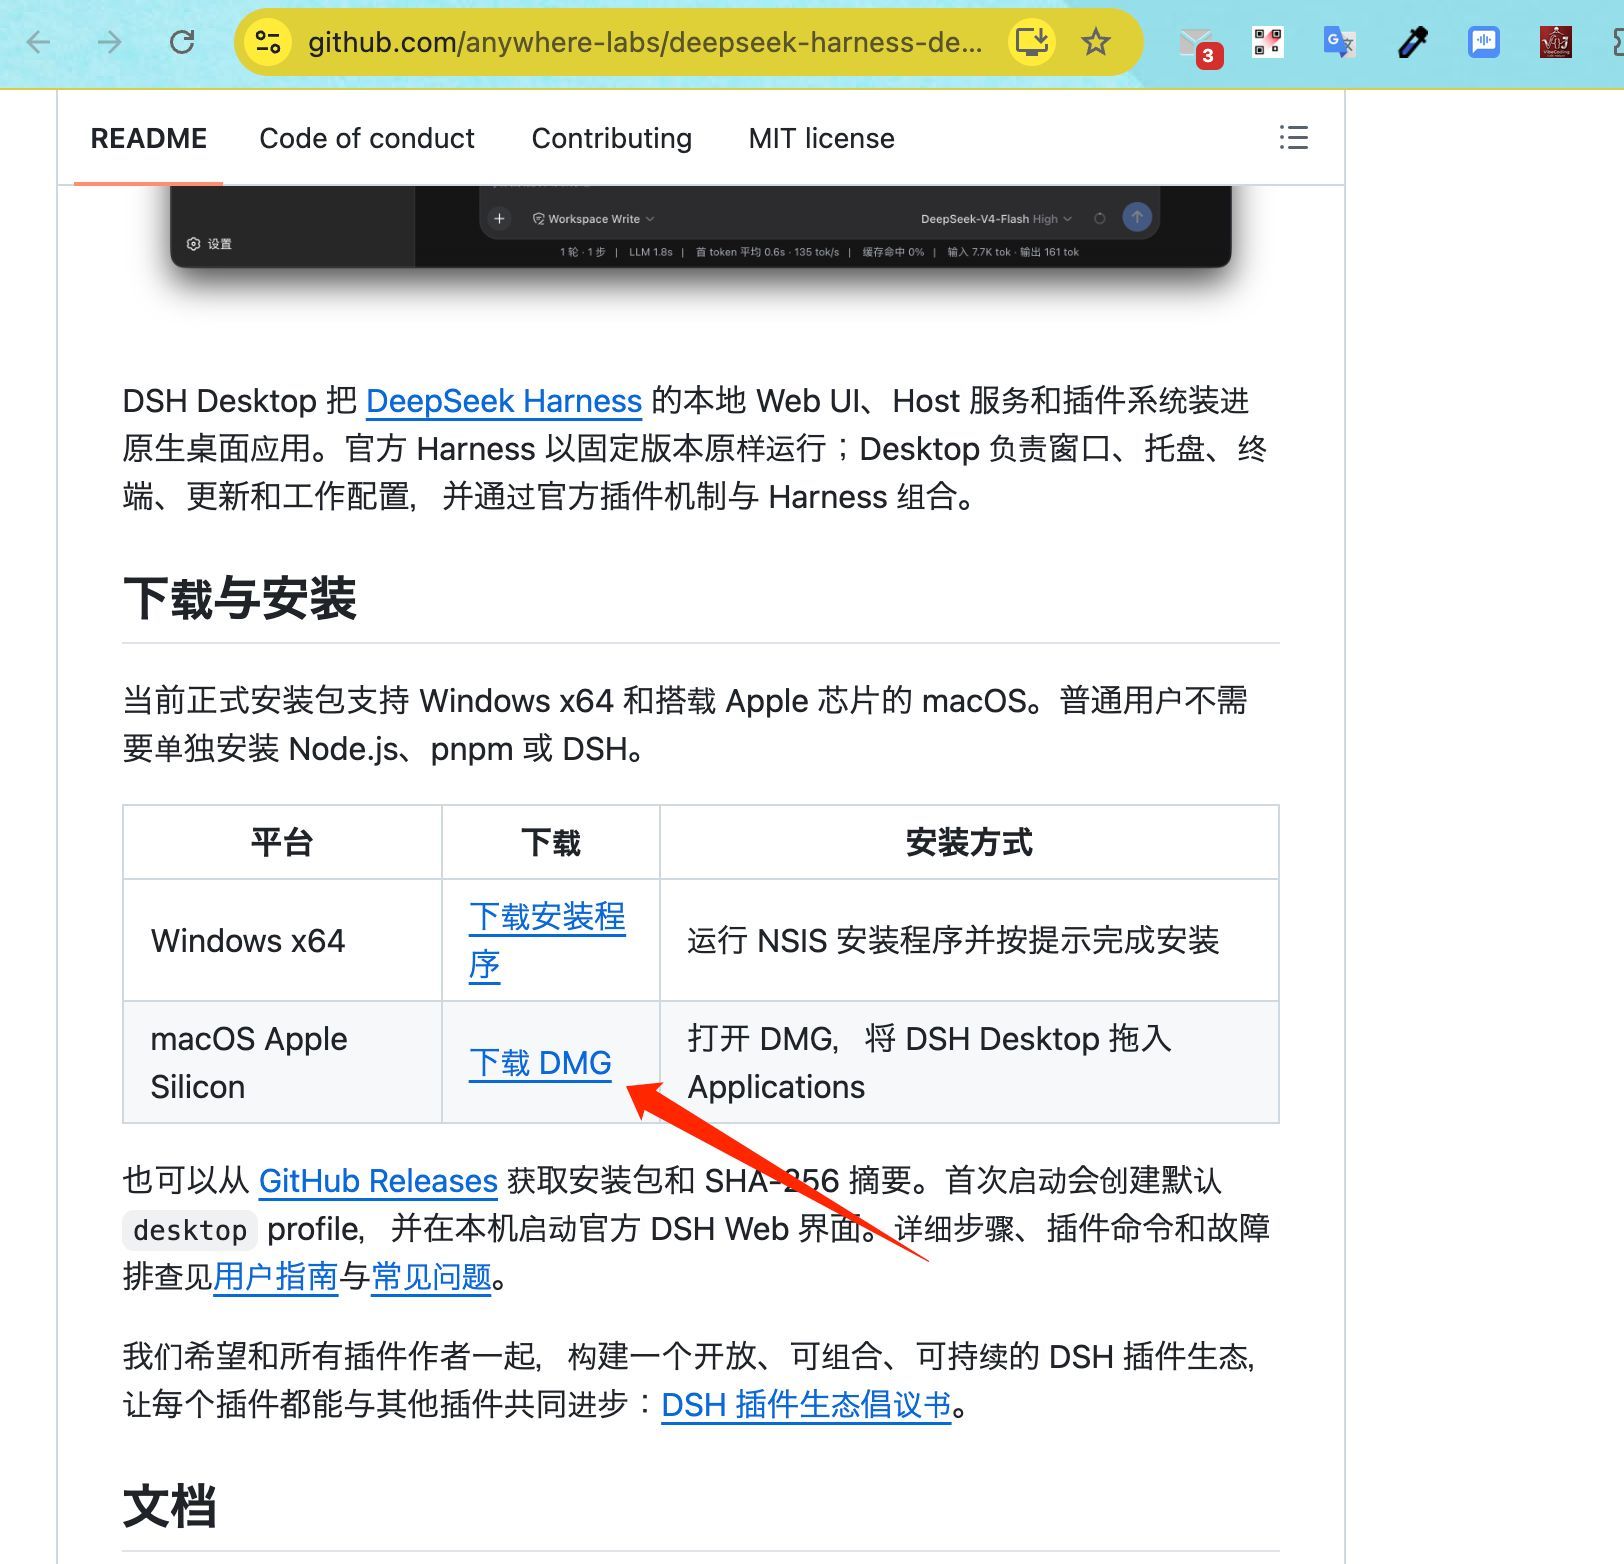
As shown in the screenshot above, the page is in Chinese.
Download the installation file that matches your operating system.
For macOS, simply download the:
DMGfile shown on the page.
Once installation is complete, open the application on your MacBook.
DeepSeek Harness should now launch successfully as a desktop application.
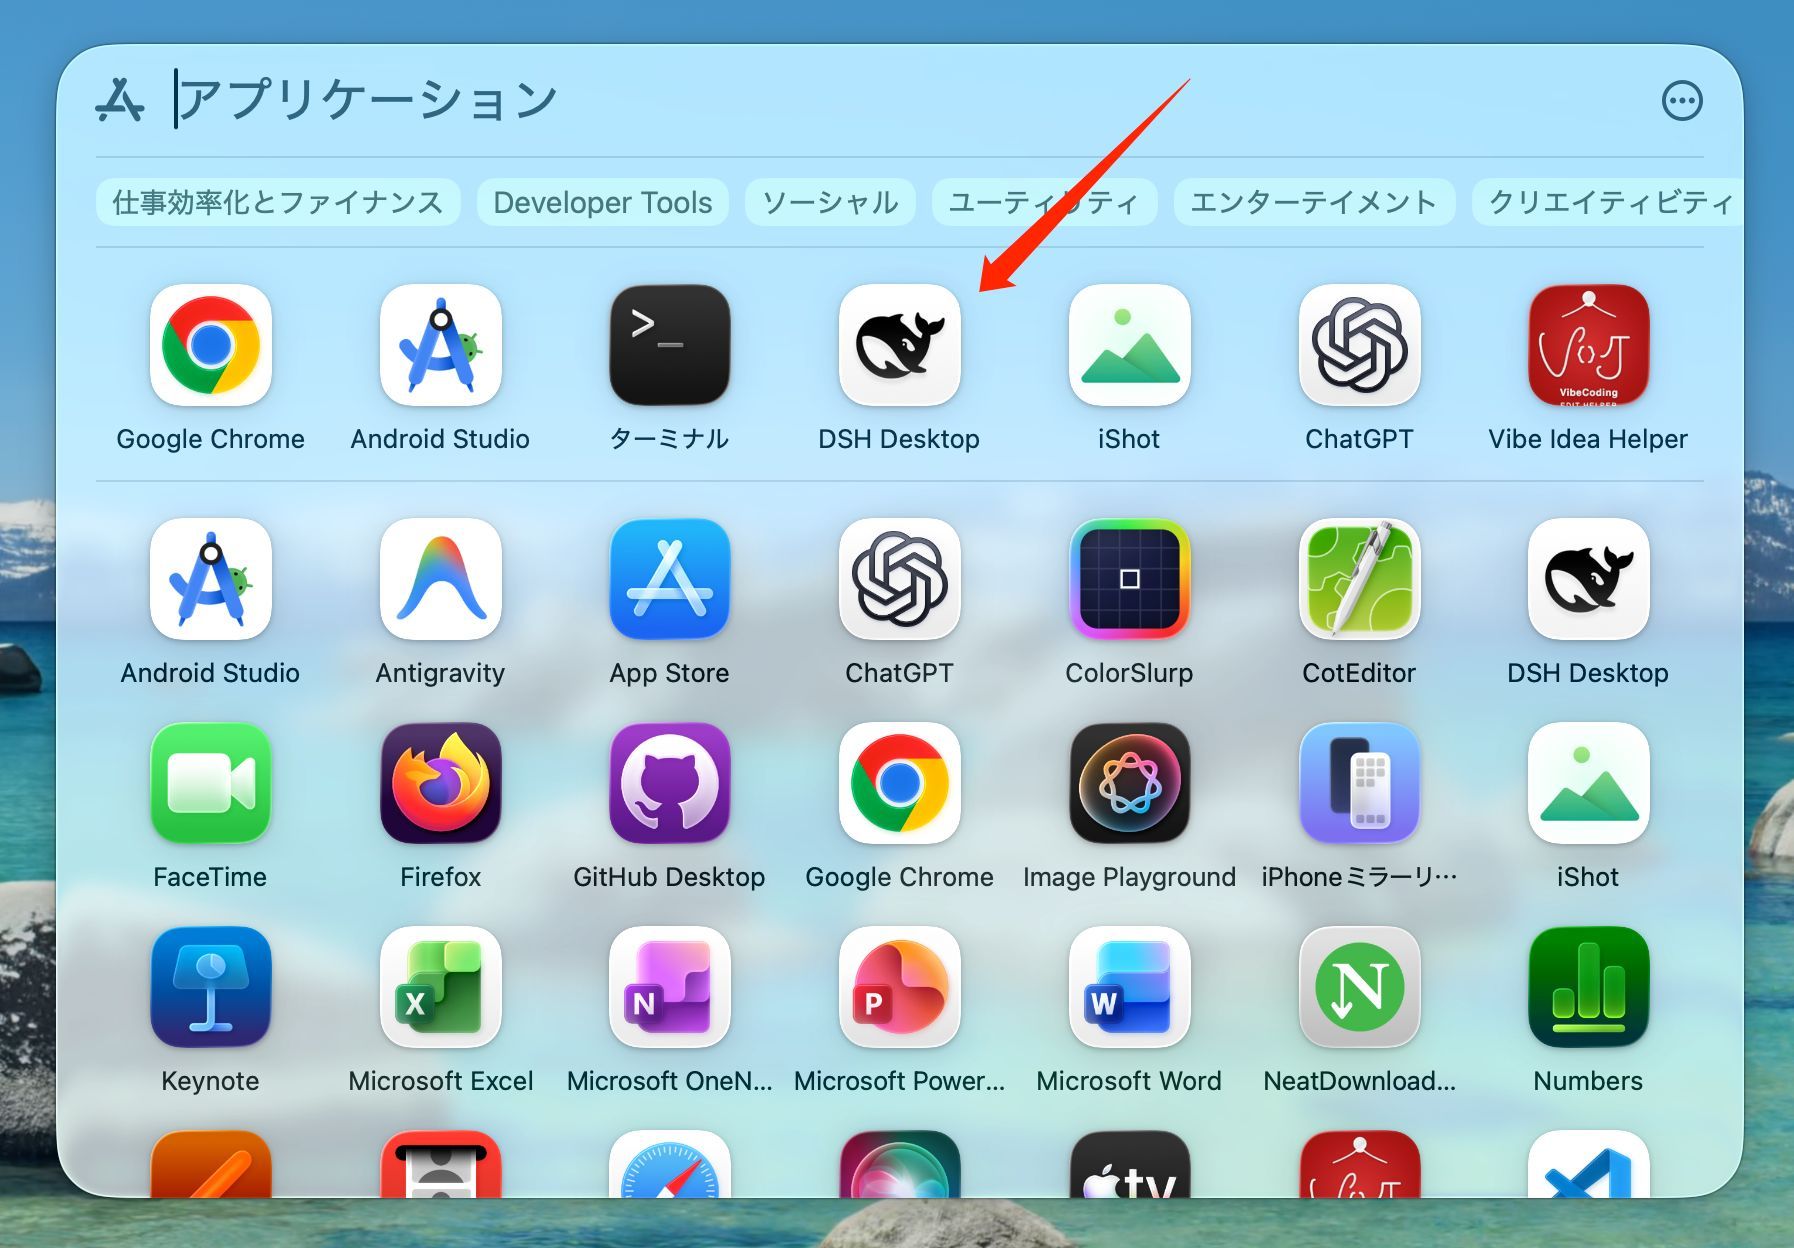
This means you no longer need to manually open the browser every time.
Personally, I find the desktop experience much more comfortable for everyday use.
6. Purchase DeepSeek API Credits
Once DeepSeek Harness is installed, the next step is to prepare the API.
DeepSeek API can be used with a relatively small amount of credit.
If you just want to test it, you can start with around $2.
If you plan to use it more actively, you can also purchase around $10 worth of credits.
First, open the official DeepSeek website:
https://www.deepseek.com/
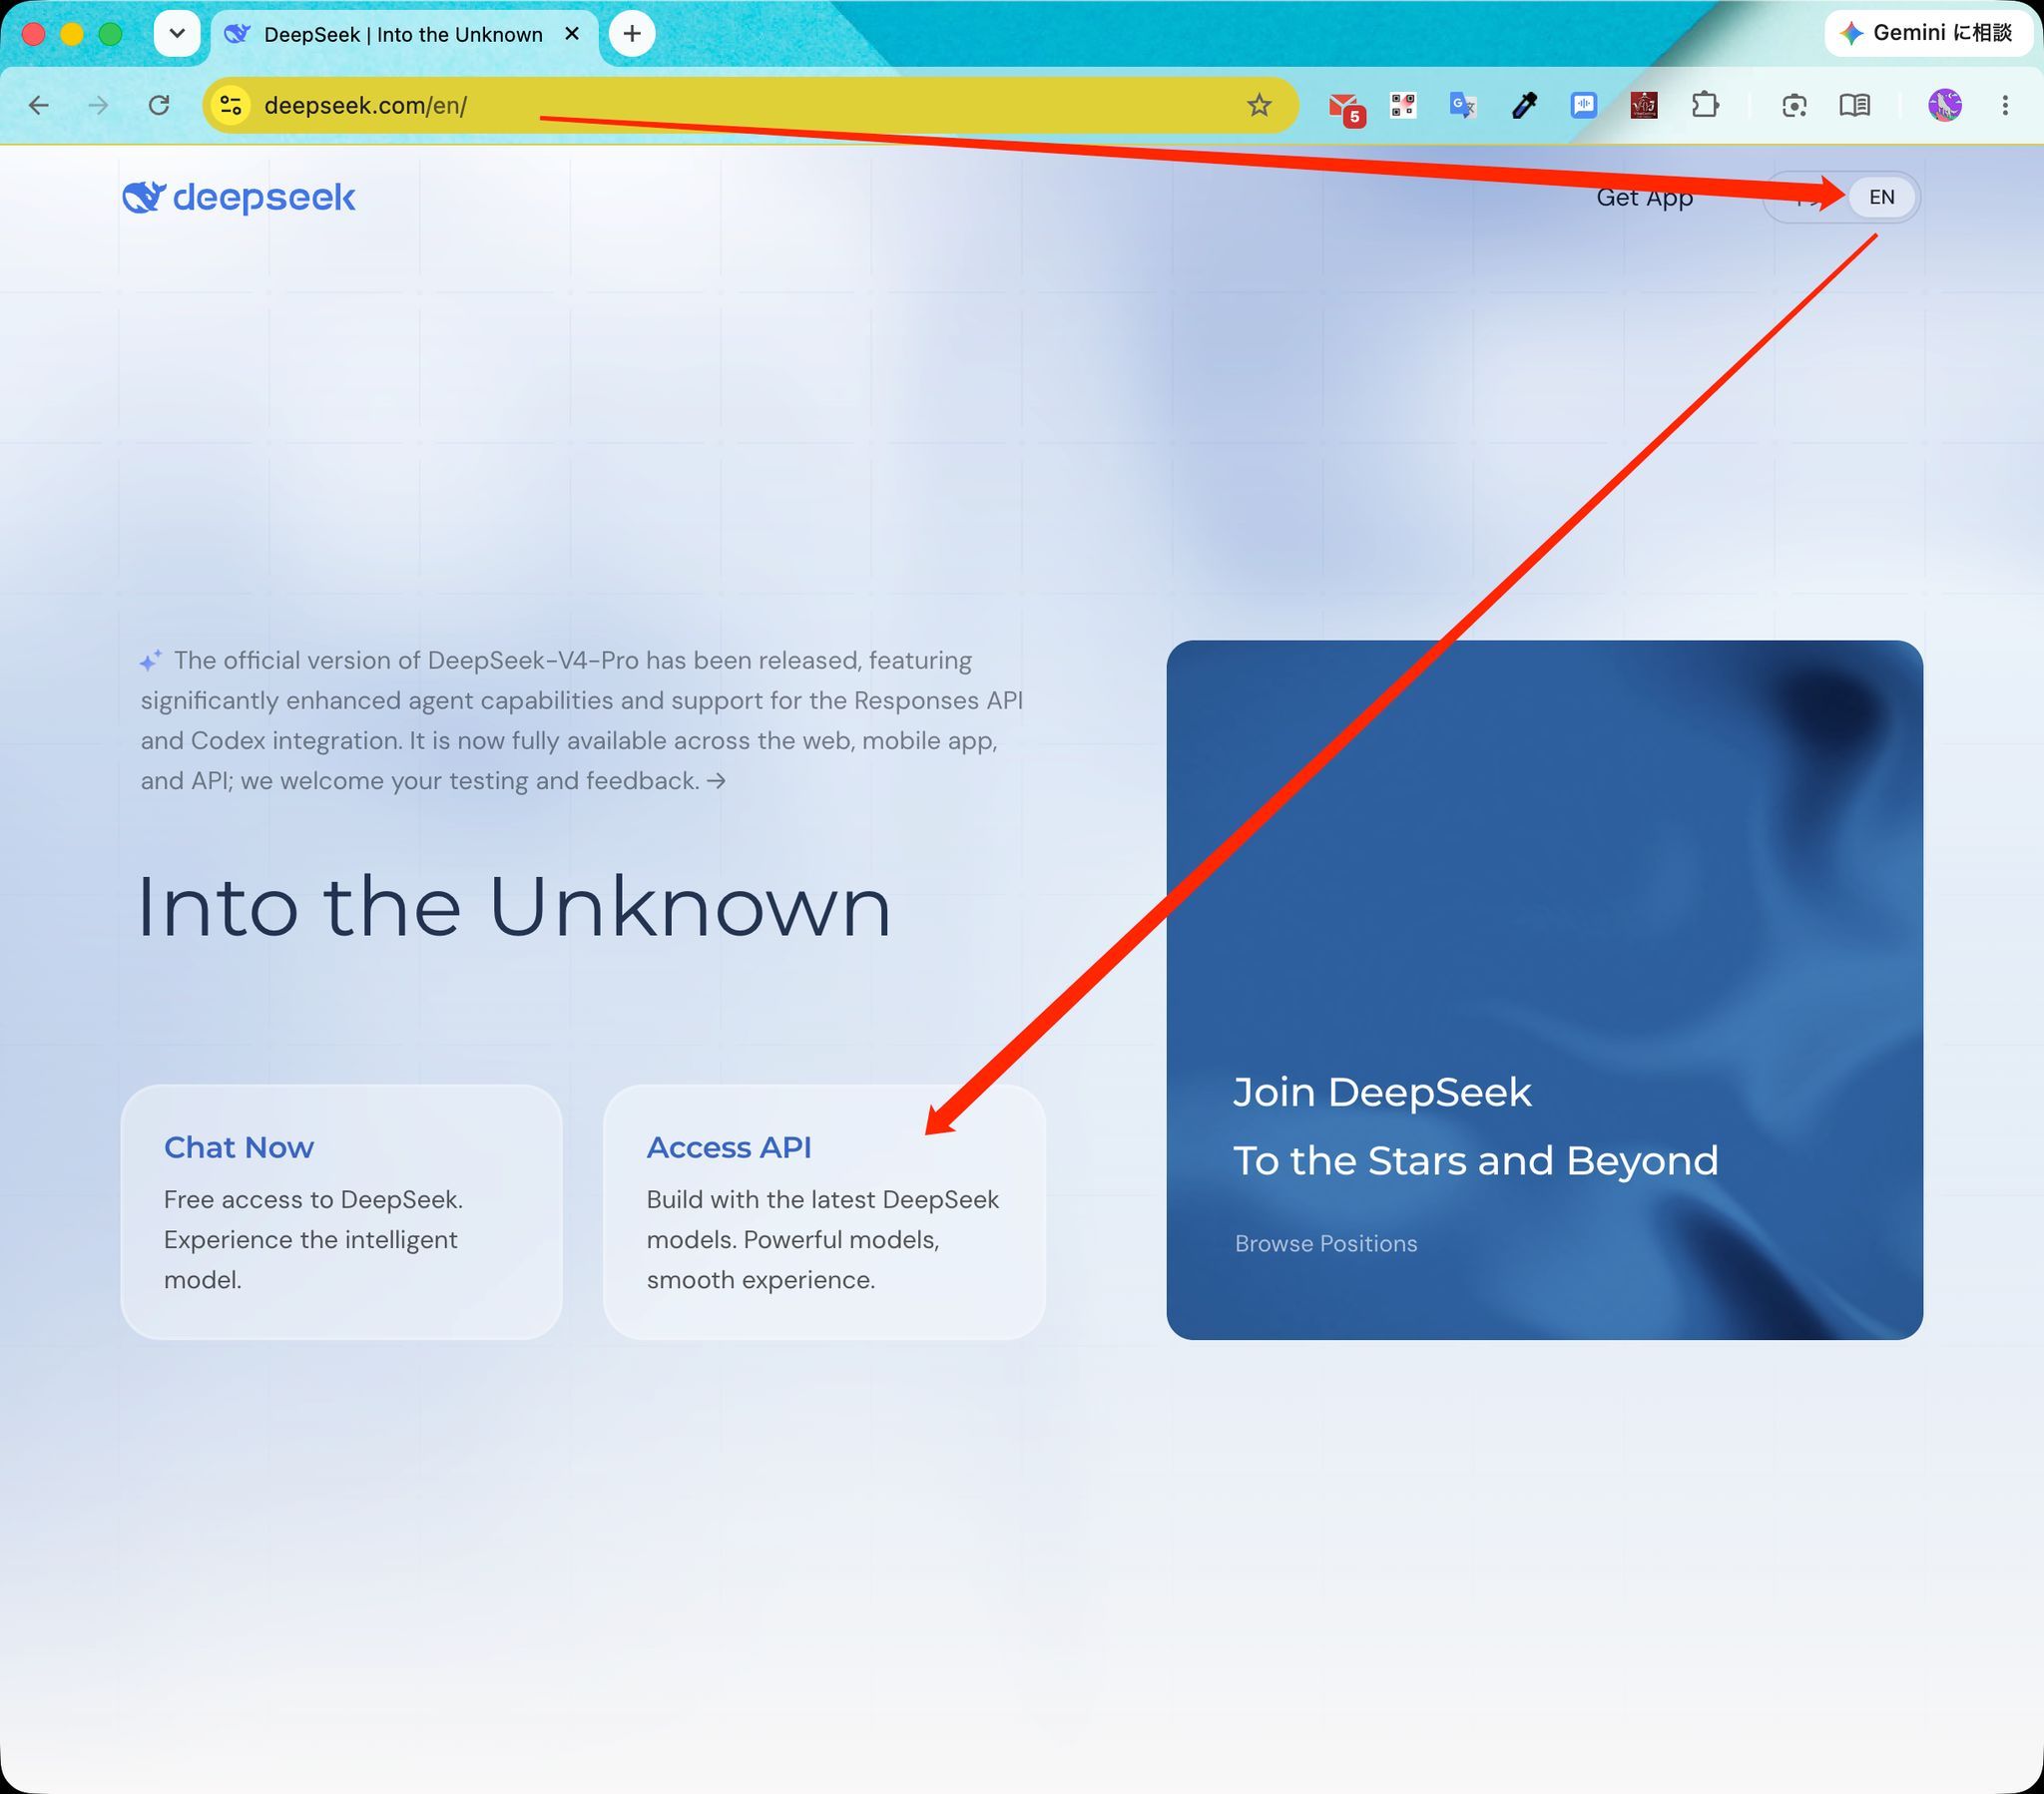
The DeepSeek website mainly supports:
- Chinese
- English
For convenience, I recommend switching to the English version.
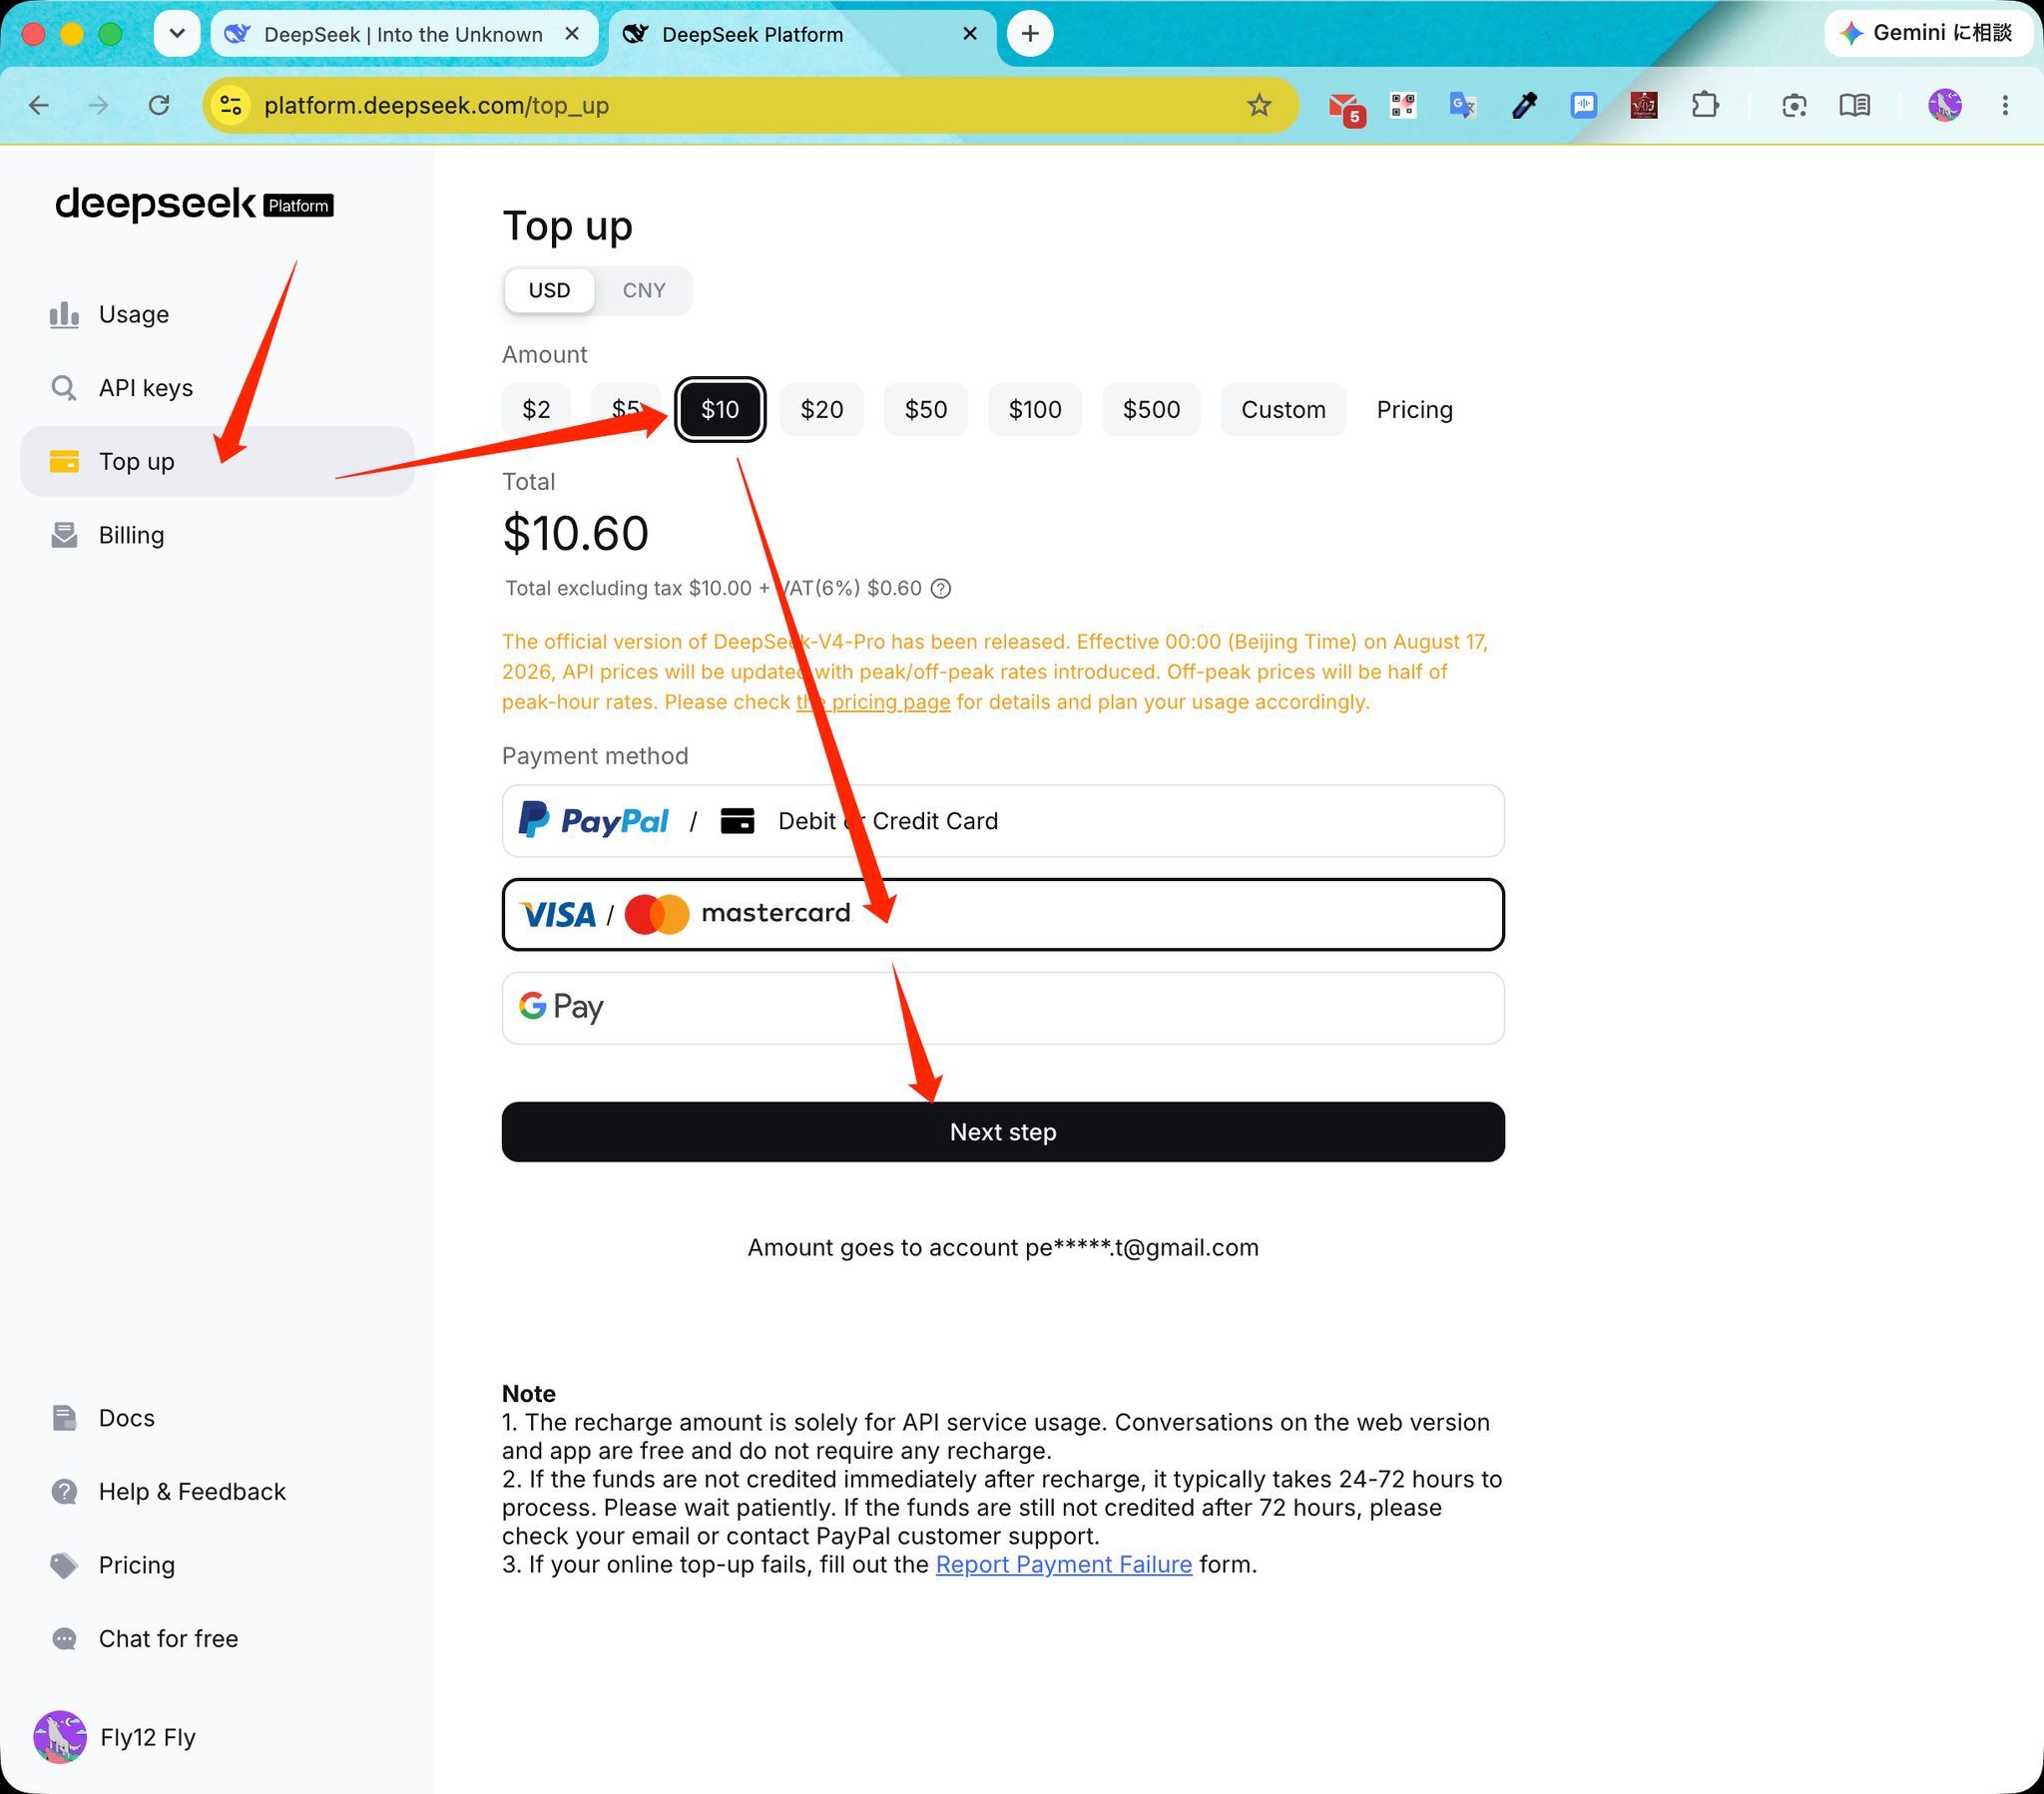
As shown above, purchase the Token / Credits required for API usage.
7. Create a DeepSeek API Key
After purchasing credits, the next step is to create an API Key.
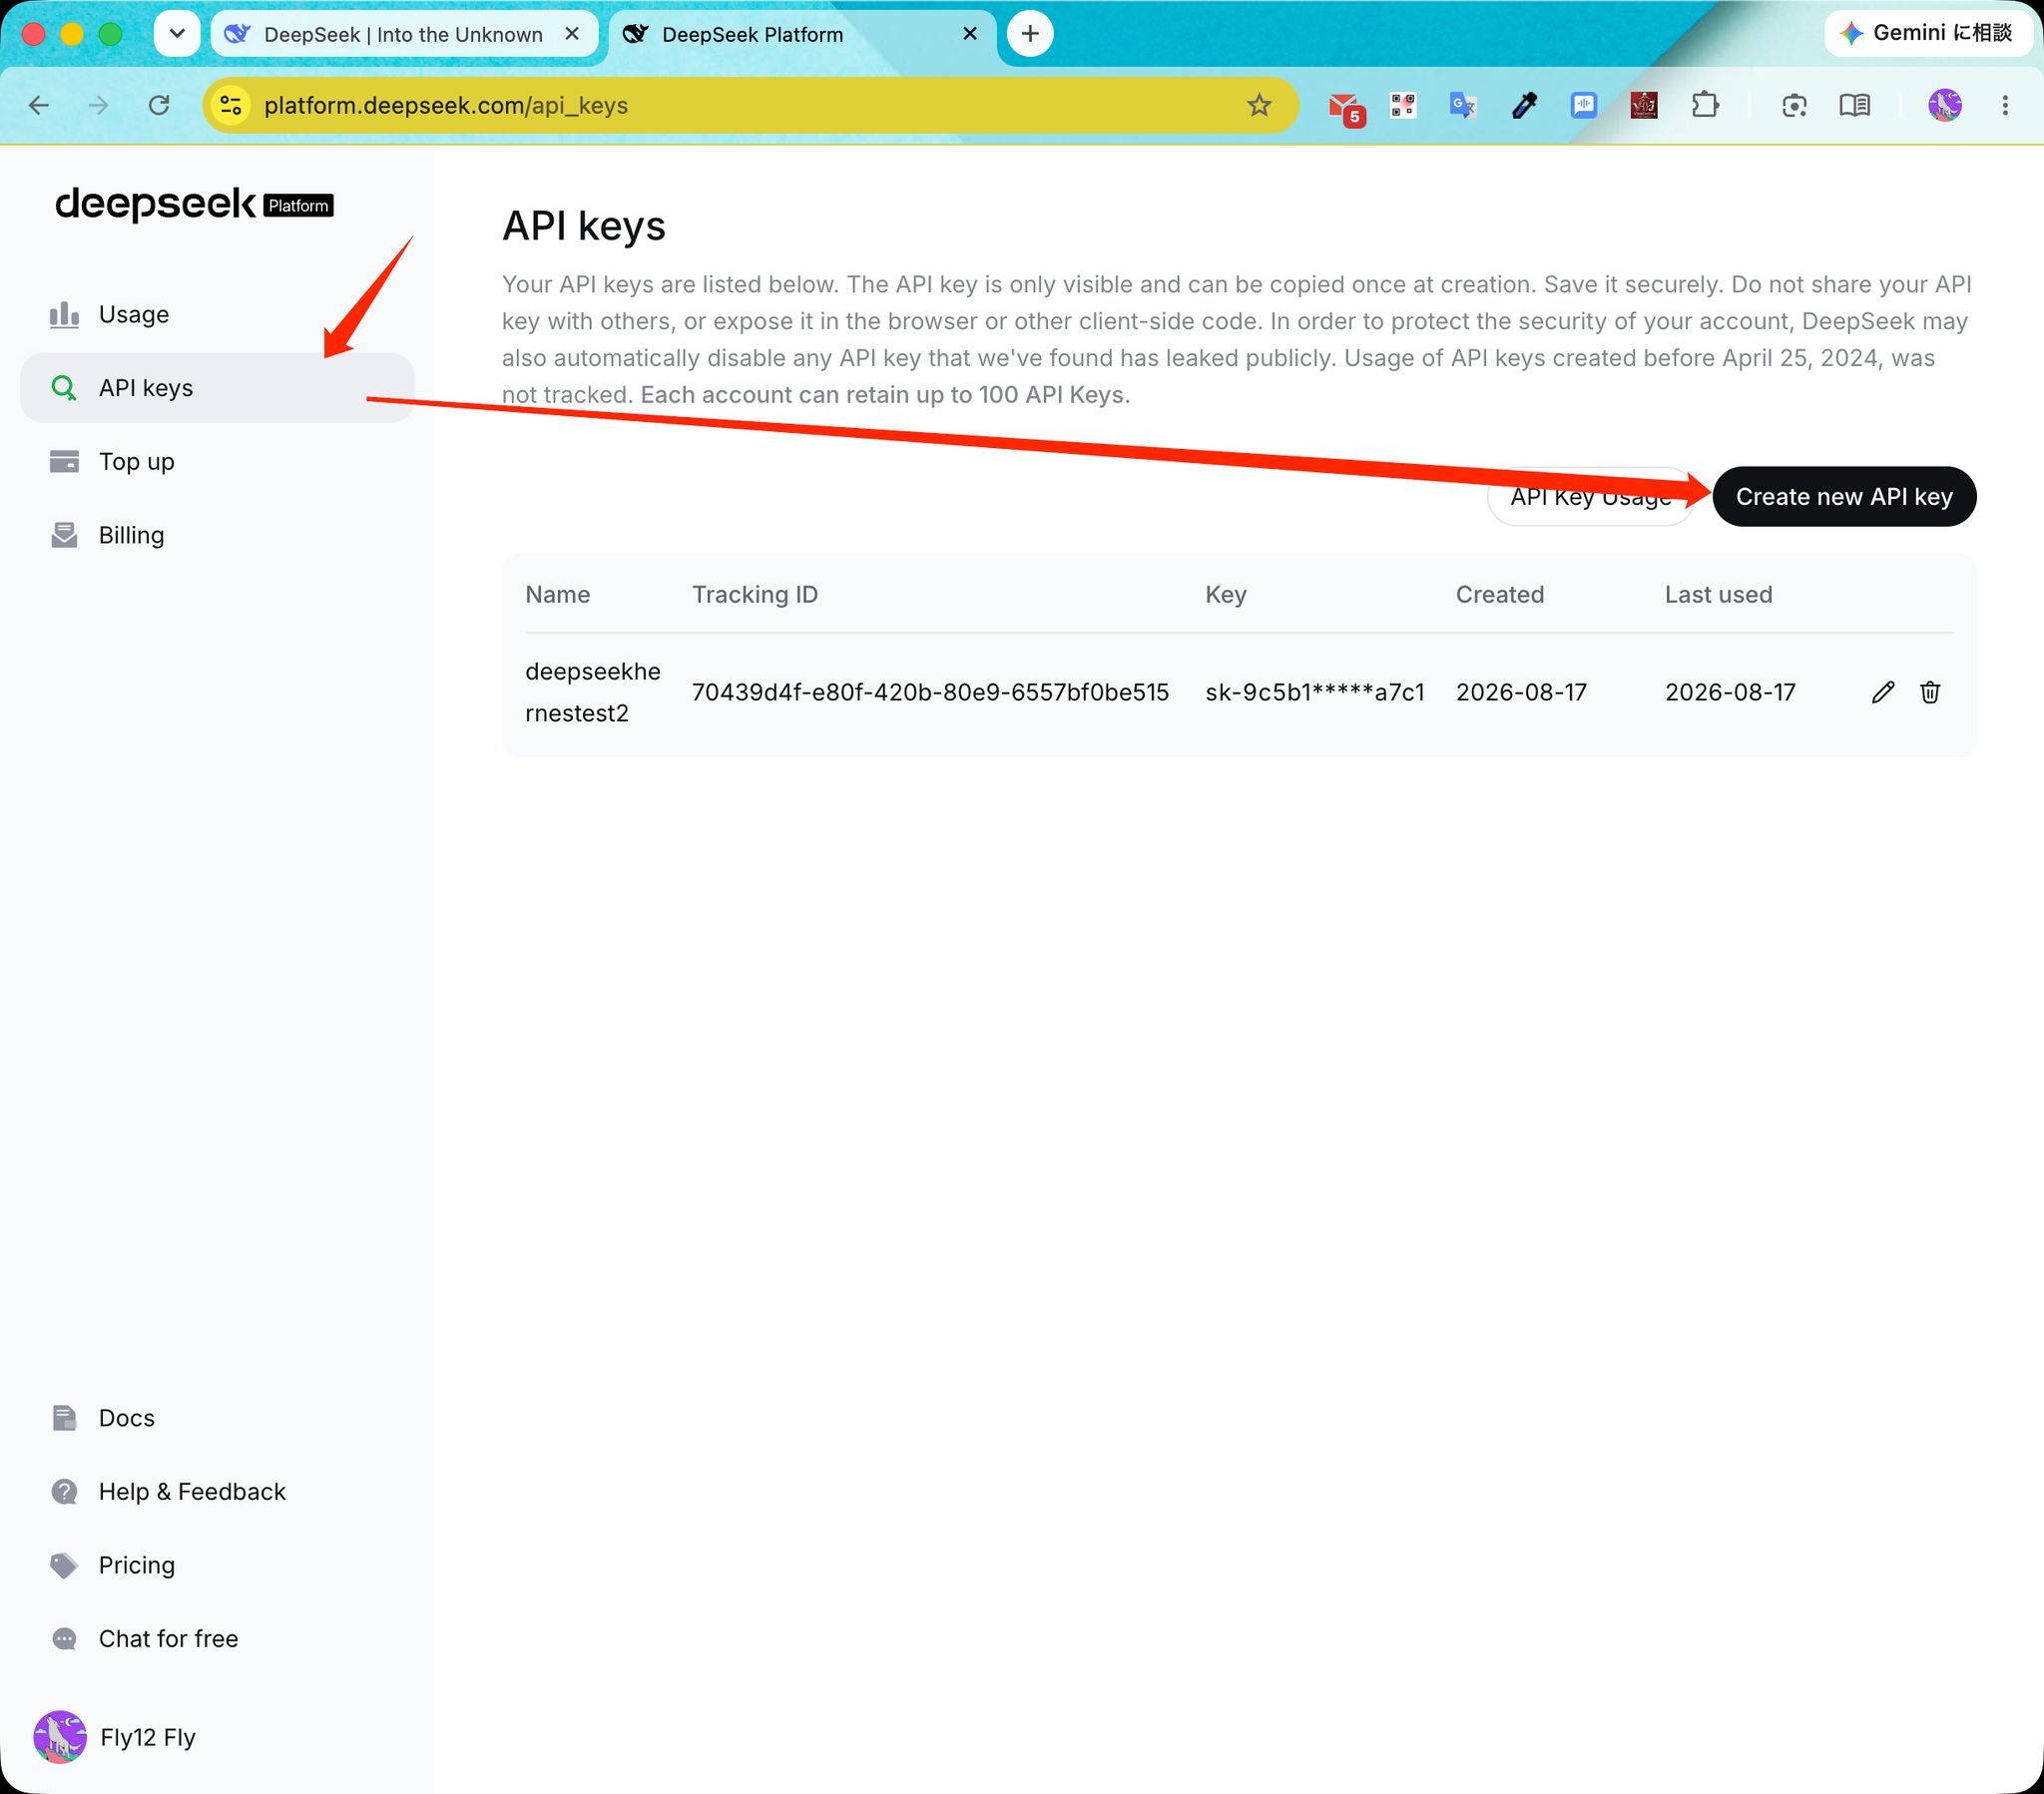
On the API Key page, create a new API Key.
The name itself does not really matter.
For example:
MacBook
DeepSeek-Harness
Test
HomeMac
Any name is fine, as long as you can remember what the Key is used for.
However, there is one very important point:
The full API Key is only displayed once.
So after creating the Key, make sure to copy it immediately and store it somewhere safe.
If you forget to copy it, or lose the Key later, you cannot display the full value again.
In that case, the solution is simply:
- Delete the old Key
- Create a new one
In principle, you can create up to 100 API Keys, so recreating one is not a serious problem.
8. Configure the API in DeepSeek Harness
Now switch back to DeepSeek Harness on your Mac.
We need to configure the DeepSeek API using the Key we just created.
For convenience, I recommend switching the interface language to English first.
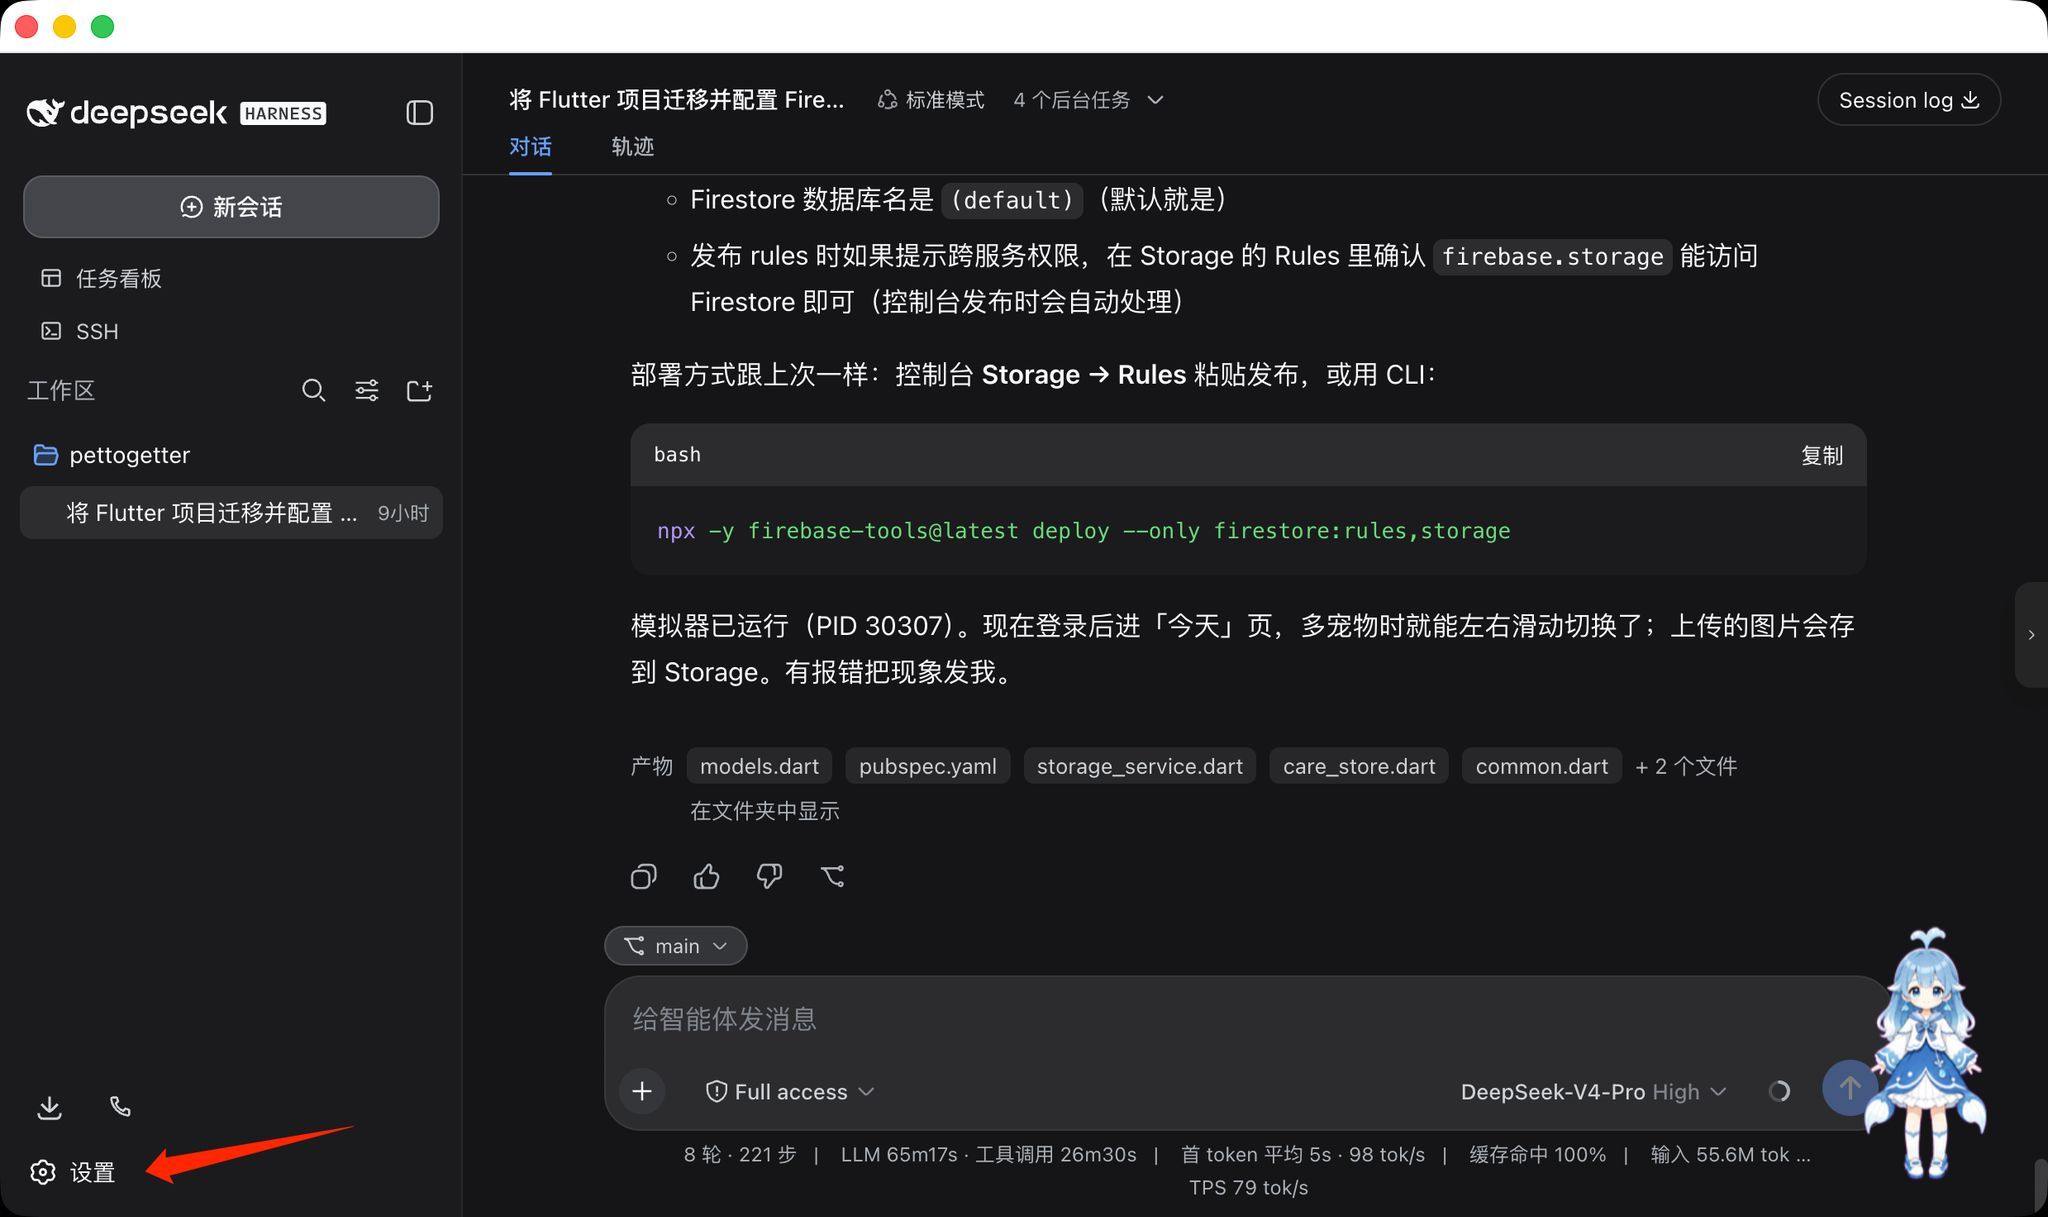
As shown above, first click:
设置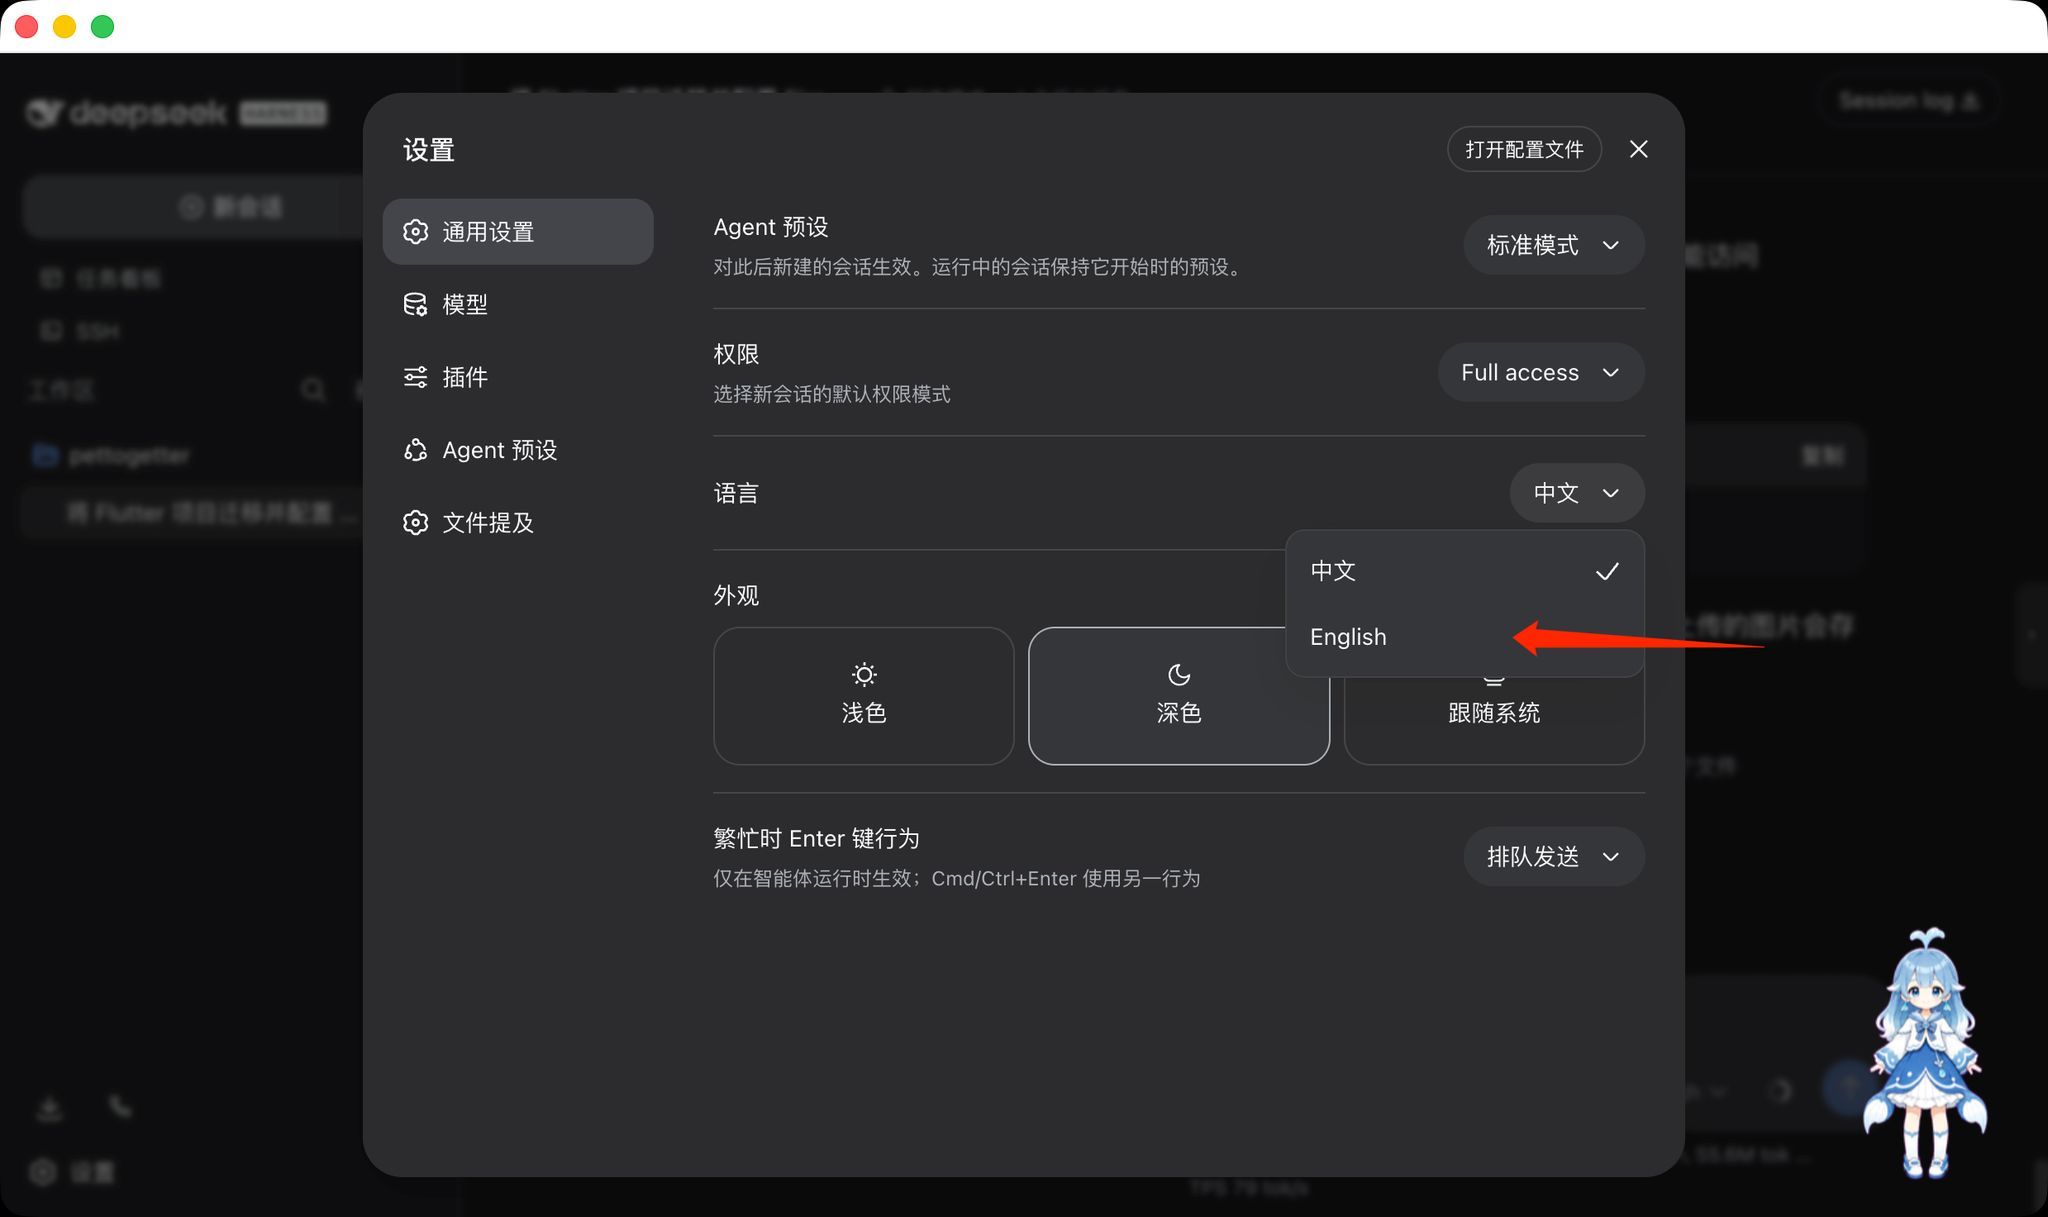
Then change the interface language to:
English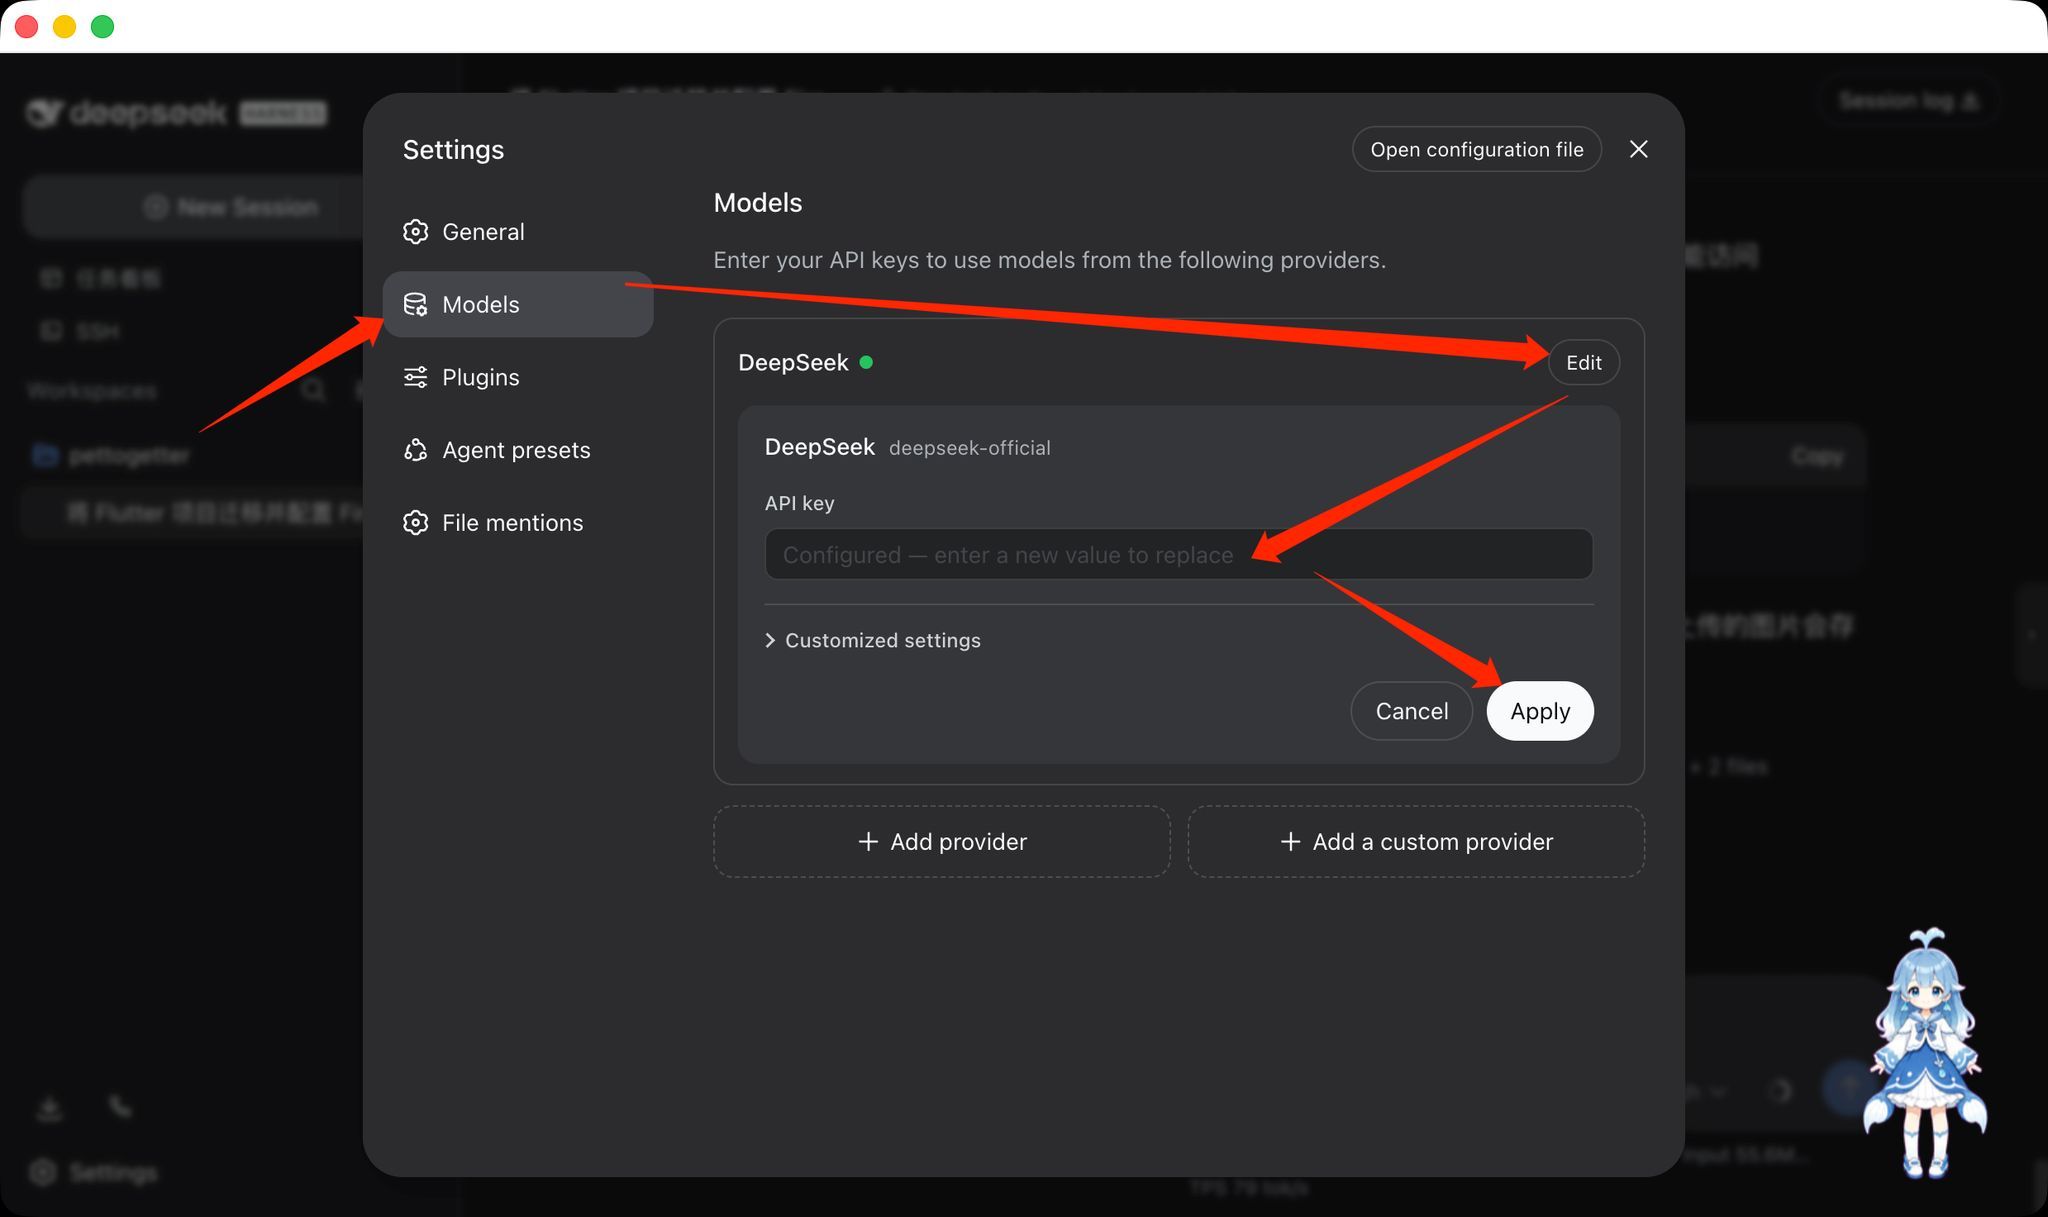
Next, open the DeepSeek API configuration section.
Paste the API Key you copied from the DeepSeek website.
This completes the connection:
DeepSeek API
        ↓
API Key
        ↓
DeepSeek Harness
At this point, the basic functionality of DeepSeek Harness should be ready to use.
9. One of the Most Interesting Features: Plugins
Now let me introduce one of the parts of DeepSeek Harness that I find particularly interesting:
Plugins
DeepSeek Harness allows users to create their own Plugins, and there is already a fairly large Plugin marketplace available.
You can browse it here:
https://dshplugin.dev/
In my opinion, this Plugin ecosystem is one of the main reasons DeepSeek Harness is attracting so much attention.
It is gradually becoming something more like:
AI Harness
+
Plugin
+
Tool
+
Workflow
rather than just a simple AI chat interface.
10. Example: Install the At File Plugin
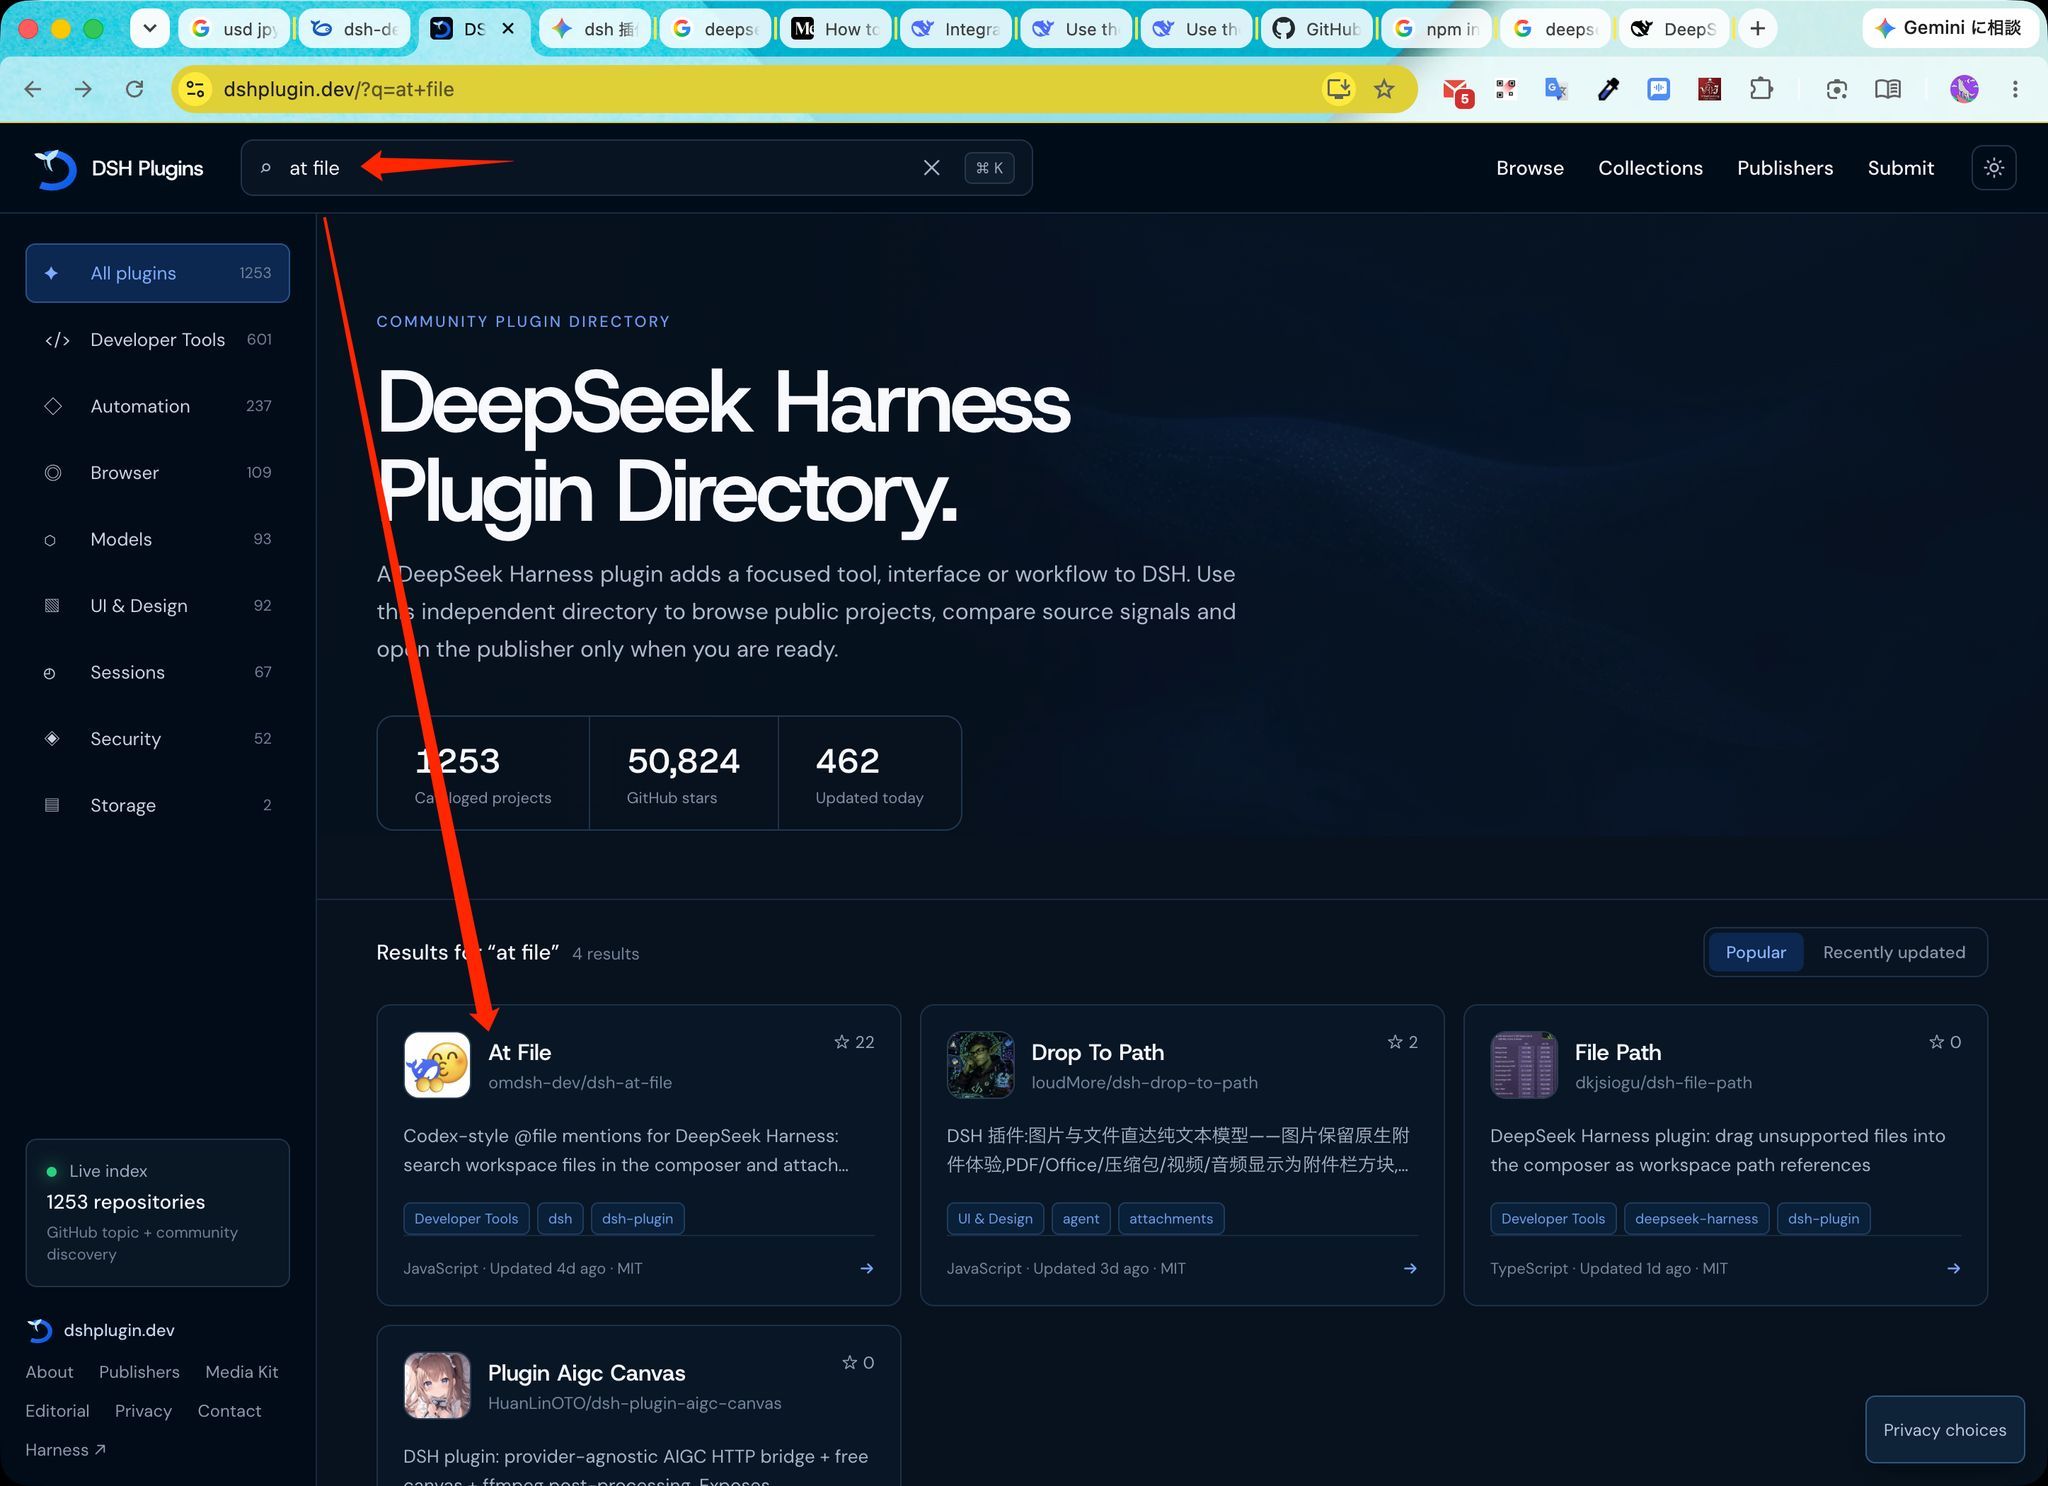
As an example, let us install a Plugin called:
At fileOnce installed, it adds a very useful feature.
The experience is quite similar to Codex.
When you type:
@DeepSeek Harness can reference files inside your current project folder.
For a Coding Agent, this is extremely useful.
For example, you can type:
@README.mdor reference a specific source code file directly.
This allows the AI to work with actual files in your current project instead of relying only on copied text.
11. Why Was Installing the dsh CLI So Important?
Now we can return to the point I mentioned at the beginning.
Why did I emphasize installing:
npm install -g @deepseek-ai/dshbefore doing anything else?
The answer is Plugins.
Many Plugins in the marketplace provide installation commands in a format such as:
dsh ...If you already installed the dsh CLI by following the earlier steps, installing a Plugin becomes very simple:
- Copy the installation command from the Plugin page
- Open Terminal
- Paste the command
- Run it
That is all.
So even if you use the Desktop version, the CLI is still extremely useful.
In fact, I think the best combination is:
Desktop for daily usage, CLI for extensions.
That gives you both convenience and flexibility.
12. Plugin Installed, but Nothing Changes in Desktop?
There is one common issue that can be confusing.
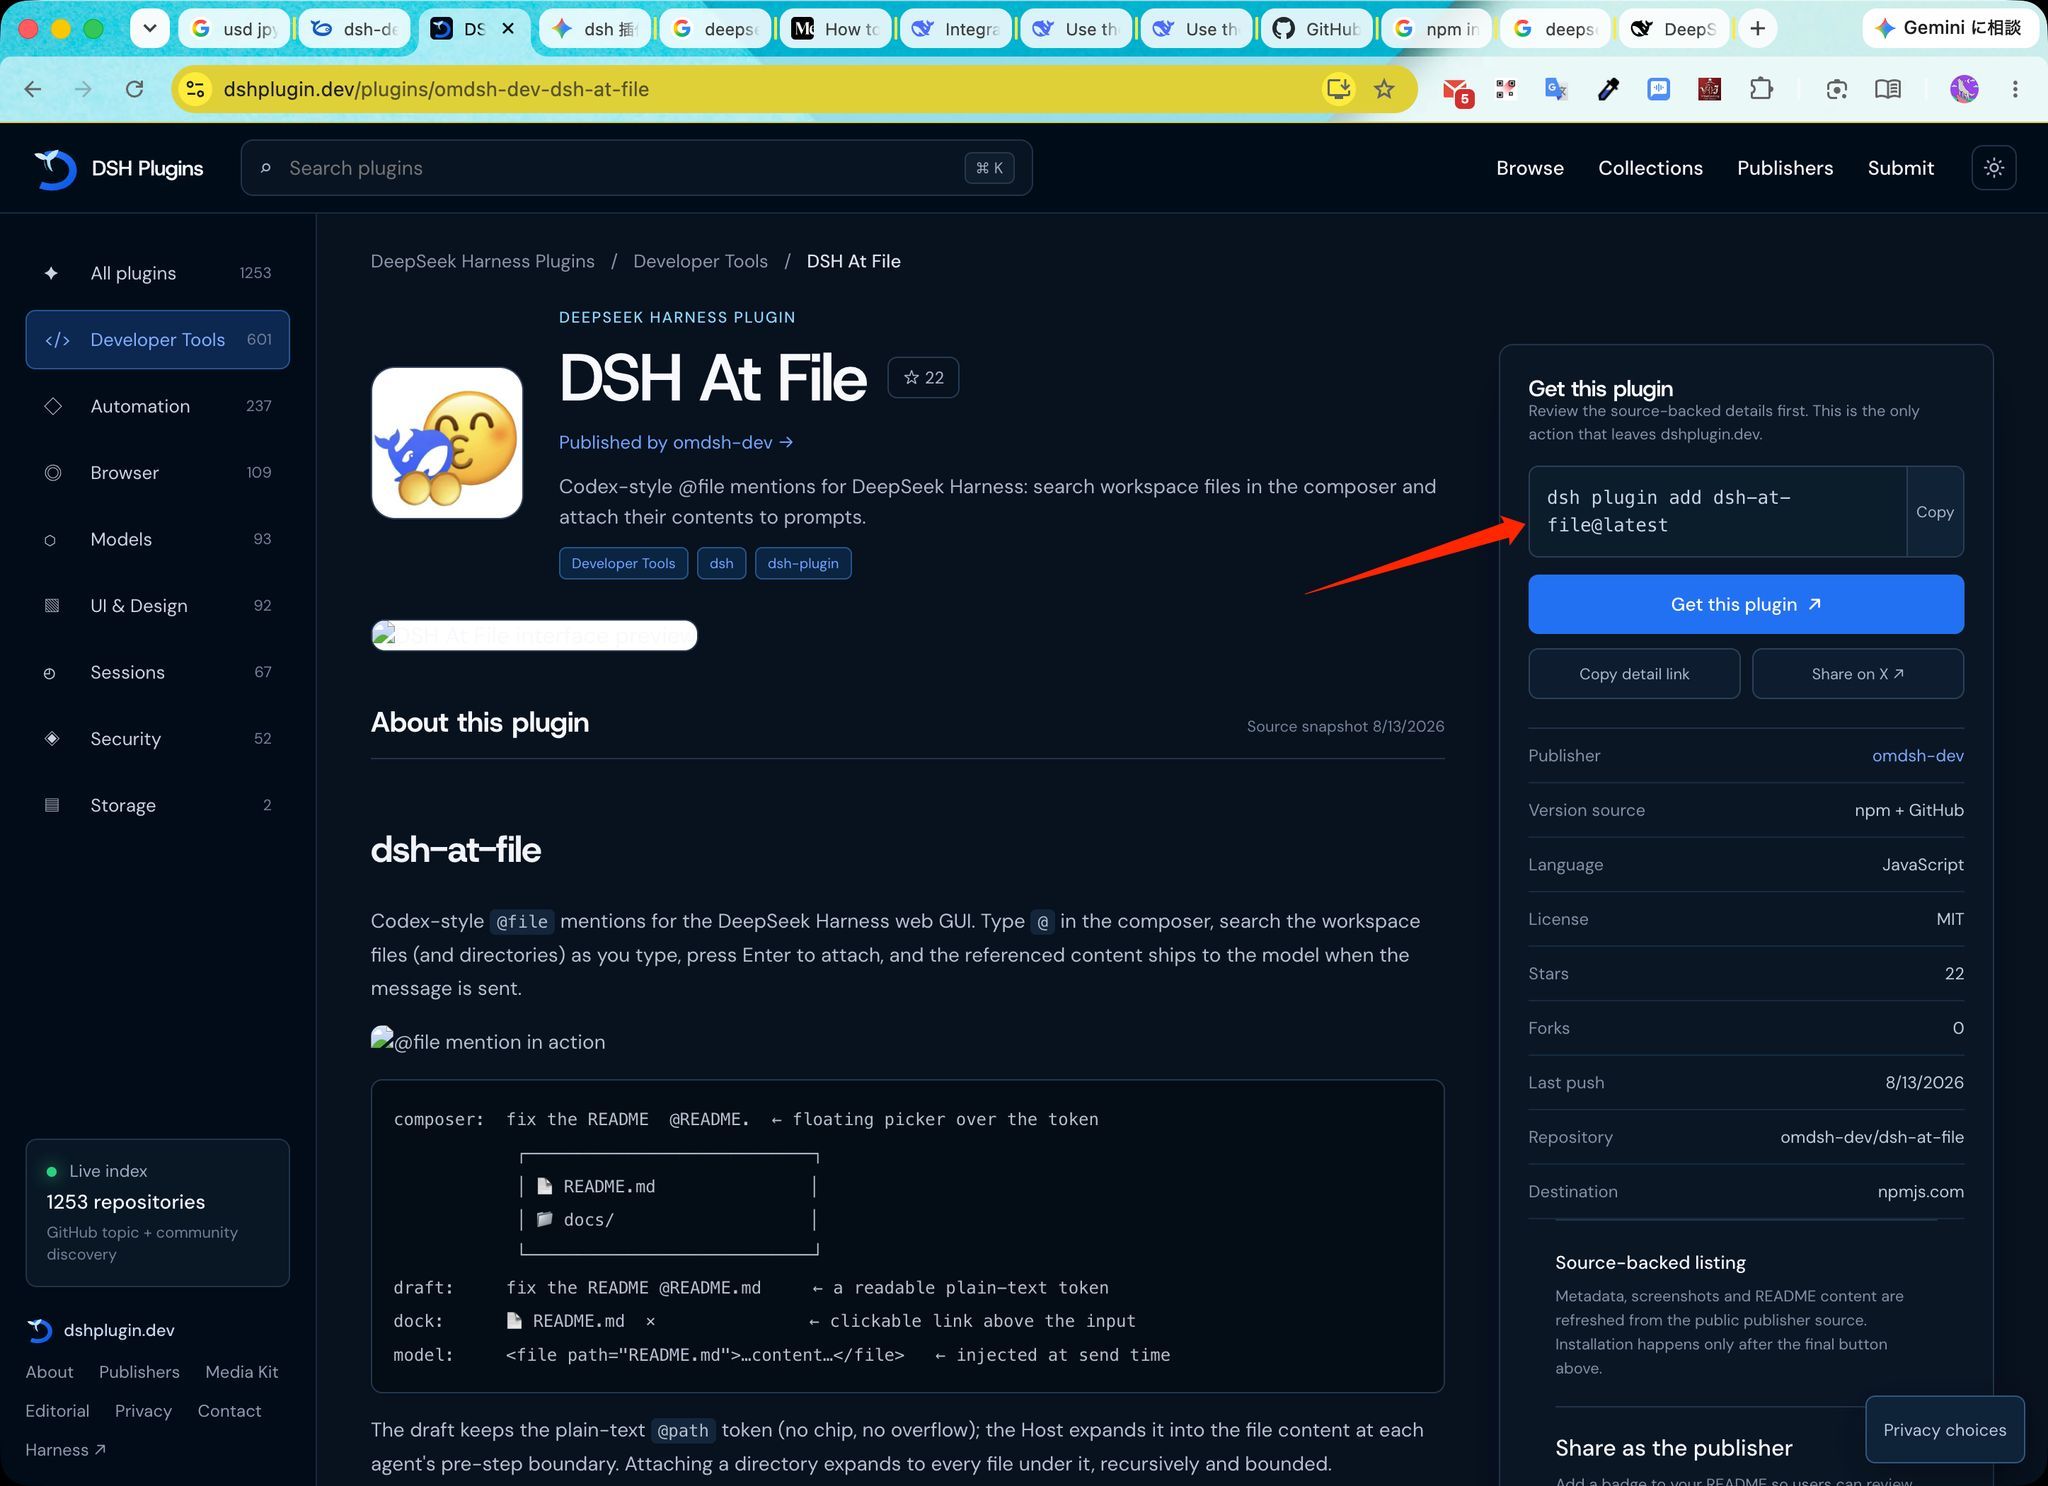
You may see that the Plugin installation completed successfully in Terminal.
However:
Nothing appears to change in the DeepSeek Harness Desktop interface.
This happens because you are currently using a different Profile.
There is one more setting to change.
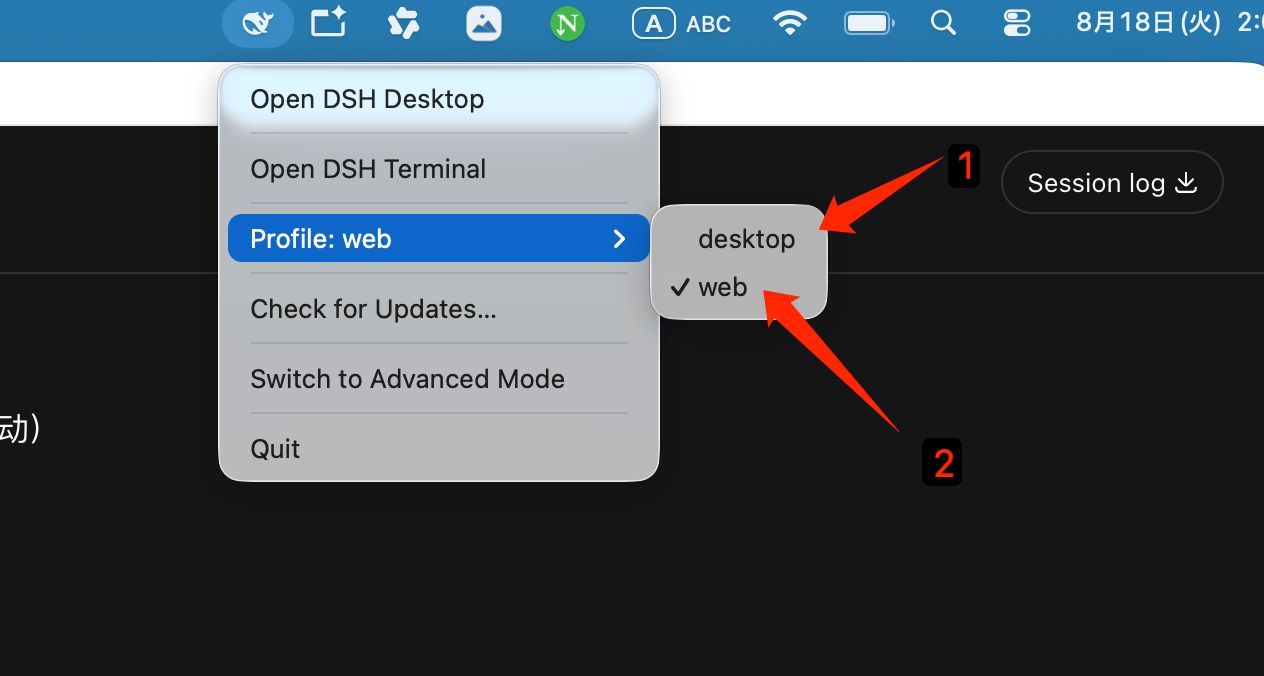
Look at the menu bar in the top-right corner of your Mac.
You should see an icon that looks somewhat like:
a whale
or perhaps something slightly similar to the Docker icon.
Click it, and then change:
Profileto:
webOnce you switch to the Web Profile, you should be able to use the Plugins installed through the CLI.
13. Why Do We Need to Switch to the Web Profile?
Here is the logic behind it.
Earlier, we used:
dsh webto start the browser-based DeepSeek Harness service.
The global Plugins installed through the CLI belong to that environment.
So the relationship is roughly:
dsh CLI
   ↓
Plugin
   ↓
web Profile
That is why, if you want to use Plugins installed through the dsh CLI, you need to switch to:
webProfile.
14. So What Is the Desktop Profile?
Then what exactly is:
desktopProfile?
You can think of it as:
A separate execution environment packaged by the third-party desktop application itself.
By default, this environment does not include the global Plugins installed through the CLI.
So personally, I think of it as:
A cleaner, relatively Plugin-free DeepSeek Harness environment.
This gives us two different modes.
Desktop Profile
Typical characteristics:
Simple
Clean
Few Plugins
Good for basic usage
Web Profile
Typical characteristics:
Supports CLI Plugins
Highly extensible
Can install many Plugins
Better for Coding / Agent / Workflow use cases
You can switch between them depending on what you are doing.
15. Will Switching Profiles Lose My Workspace or Context?
This is another question people may naturally have.
For example:
If I am working in Desktop and then switch to Web, will my project disappear?
In practice, this is not a problem.
Both Profiles share the same Workspace storage area.
So even if you switch between:
desktopand:
webyour Workspace data remains available.
The structure is roughly like this:
Desktop
       ↘
        Workspace
       ↗
Web
In other words, you can use Desktop and Web for different purposes while continuing to work in the same Workspace.
Final Summary
The full setup flow looks like this:
Node.js
   ↓
Install dsh CLI
   ↓
Install pnpm
   ↓
Install DeepSeek Harness Desktop
   ↓
Purchase DeepSeek API Credits
   ↓
Create API Key
   ↓
Configure API in DeepSeek Harness
   ↓
Install Plugins
   ↓
Switch to Web Profile
Personally, I really like this setup.
Instead of choosing only the official CLI or only the Desktop application, it combines:
the extensibility of the CLI
with:
the usability of a desktop application.
For daily work, I can use the Desktop app.
When I need additional functionality, I can install Plugins with:
dshThen I can switch between:
desktopand:
webdepending on the task.
I think this makes DeepSeek Harness much more comfortable and flexible to use.
What makes DeepSeek Harness especially interesting is that it is not just another AI chat tool.
With Plugins and Workflows, it can gradually become a customizable AI working environment tailored to your own needs.
I have only started exploring it, but I am very interested to see what kinds of Plugins and workflows will appear next.
Enjoy DeepSeek Harness!